

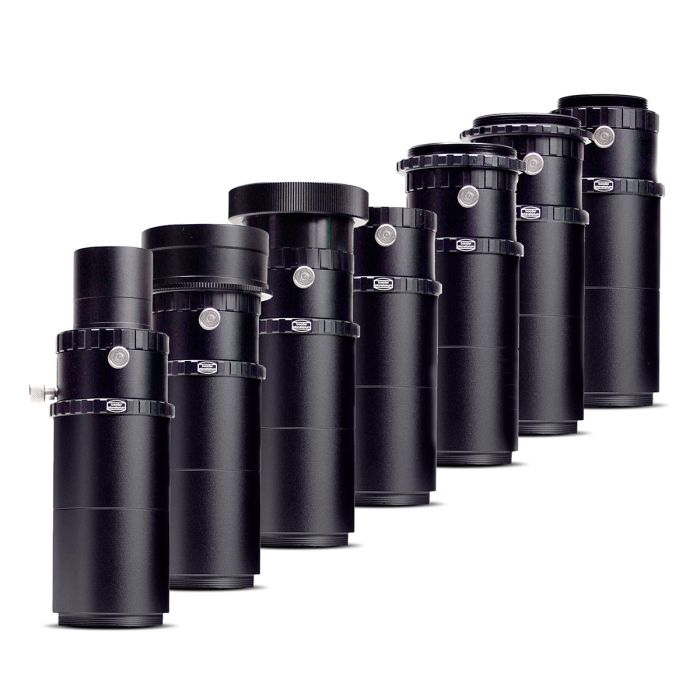
Baader Ocular Projection and Focal Adapter System: Available in 7 Configurations
Contiguous US / Lower 48:
Free shipping applies to orders over $50 using our chosen carrier/method. Faster paid options are available at checkout.
Alaska, Hawaii & US Territories:
Free shipping applies to many—but not all—products. Enter your ZIP code in cart or upon checkout to confirm options and costs.
International:
International orders do not qualify for free shipping. Shipping, duties, brokerage, tariffs, and taxes are the customer’s responsibility. Some items may be restricted due to export, size, or manufacturer limitations.
Each OPFA is a complete accessory set for focal photography and eyepiece projection (without projection eyepiece and without T-2-ring for the camera) with connection to the telescope, sliding focuser and 2 pieces of 40mm T-2 extension tubes. A suitable T-2-ring for your camera must be ordered separately.
The OPFA projection systems can be set to be light-tight and bolt-tight, so nothing can wobble anymore. With additional T-2 extension tubes, even extreme projection scales can be achieved – even with CCD cameras!
Each eyepiece projection works in the same way, although there are some practical differences whether the camera is used WITH or WITHOUT lens. When working with a (digital) SLR camera, the lens is usually removed, and the camera body is attached directly to the projection unit.
If the camera lens is integrated into the system, this is called afocal projection. This is the usual method when shooting with digital viewfinder cameras, where the lens can NOT be removed. For these cameras, we recommend the ADPS, which can be set to a short distance between eyepiece and camera lens. The following diagram shows the structure of the classic eyepiece projection with cameras, where the lens can be removed.
The focus plane or focal image of the telescope is projected onto the film/camera sensor via a projection eyepiece (similar to a slide projector, which projects the magnified slide onto a screen). The resulting focal length is called the equivalent focal length (fE).
The reproduction scale depends on the focal length of the eyepiece (fEP) and the projection distance (a). The equivalent focal length is calculated as follows (the longer it gets, the bigger the image on the film becomes):
f_E = fprimary × ((a ÷ fEP) - 1)
The effect of the different parameters can easily be seen from the formula. If the eyepiece focal length is reduced and / or the distance a (between focal point of the eyepiece and the camera sensor/film) is increased, the value of the equivalent focal length (and with it, the magnification) increases; the picture gets bigger.
The OPFA units are set up (from right to left) as in the following example:
Refer to the third photo above. The parts marked in blue correspond to the OPFA-4 basic version, which has a male T-2-thread on the with camera side and a female T-2-thread on the telescope side. Each OPFA (model 1-3 and 5-7) has got another telescope adapter included in the scope of delivery. In the example, the adapters of OPFA 1 and 2 are shown in green. The parts marked in red are not included in any OPFA!
The unit starts on the telescope side, i.e. on the focuser (to the right). Shown in the picture are OPFA-1 (1¼" nosepiece) and OPFA-2 (2" nosepiece). If your focuser has a different connector, you have to choose between OPFA-3 and OPFA-7 (e.g. OPFA-3 for Celestron and Meade Schmidt-Cassegrain telescopes).
This is followed by a sliding focuser with a T-2 locking ring. The 1¼" eyepiece (not supplied) is inserted into this sliding focuser and clamped in. The function of the locking ring and the sliding focuser is described below.
Now, the two 40mm T-2 extension tubes are screwed onto the sliding focuser, the eyepiece (outer diameters of up to 38mm are possible) will be inside of the T-2 extensions. The extensions are used to set the distance between eyepiece and camera (ie to establish the projection distance). By adding more T-2 extensions (see our Astro T2 system), the distance (and the image) can be enlarged.
The OPFA is connected to the (digital) SLR camera through a camera-specific T-ring (not included).
The function of the sliding focuser and the locking ring
The sliding focuser makes a fine adjustment of the projection distance possible a by slightly pushing the eyepiece forward or backward.
By loosening the locking ring, the complete unit can be rotated steplessly, until the attached camera is to set to a favorable orientation. Of course, for the models OPFA-1 and OPFA-2 the camera can also be rotated with the complete unit.
In the models OPFA-3 to OPFA-7, the connection from the OPFA to the focuser is a rigid screw connection. Here, the camera orientation can only be changed via the locking ring of the sliding focuser.
OPFA System Layout
The fourth photo above gives an idea of the flexibility and different configurations possible for use in a standard eyepiece projection setup (see below images for some afocal setups). The OPFA takes advantage of its compatibility with the Astro-T2 System, permitting you to design the exact system to fit your needs. Any 1.25" eyepiece (up to 37mm body diameter) may be used. The eyepiece is securely retained with a separate knurled lock screw.
The OPFA incorporates a novel sliding focuser assembly (#24), which permits you easily vary the distance between the eyepiece and camera (total travel of 12mm). Simply loosen the lock screw, adjust the focus tube, and securely lock in place at the desired position. Additional distances can be achieved by the use of any of our Extension Tubes (two 40mm extension tubes #25B are supplied as part of the OPFA). This feature is particularly valuable in matching the eyepiece-to-lens distance for afocal projection systems (see below for some images of several digital cameras setup for afocal projection imaging).
Useful Resources
For more information about using this item with other Baader components, as well as to see some typical configurations using popular digital cameras in afocal projection, please visit this link.
Other Information
- Country of Manufacture: Germany
Each OPFA is a complete accessory set for focal photography and eyepiece projection (without projection eyepiece and without T-2-ring for the camera) with connection to the telescope, sliding focuser and 2 pieces of 40mm T-2 extension tubes. A suitable T-2-ring for your camera must be ordered separately.
The OPFA projection systems can be set to be light-tight and bolt-tight, so nothing can wobble anymore. With additional T-2 extension tubes, even extreme projection scales can be achieved – even with CCD cameras!
Each eyepiece projection works in the same way, although there are some practical differences whether the camera is used WITH or WITHOUT lens. When working with a (digital) SLR camera, the lens is usually removed, and the camera body is attached directly to the projection unit.
If the camera lens is integrated into the system, this is called afocal projection. This is the usual method when shooting with digital viewfinder cameras, where the lens can NOT be removed. For these cameras, we recommend the ADPS, which can be set to a short distance between eyepiece and camera lens. The following diagram shows the structure of the classic eyepiece projection with cameras, where the lens can be removed.
The focus plane or focal image of the telescope is projected onto the film/camera sensor via a projection eyepiece (similar to a slide projector, which projects the magnified slide onto a screen). The resulting focal length is called the equivalent focal length (fE).
The reproduction scale depends on the focal length of the eyepiece (fEP) and the projection distance (a). The equivalent focal length is calculated as follows (the longer it gets, the bigger the image on the film becomes):
f_E = fprimary × ((a ÷ fEP) - 1)
The effect of the different parameters can easily be seen from the formula. If the eyepiece focal length is reduced and / or the distance a (between focal point of the eyepiece and the camera sensor/film) is increased, the value of the equivalent focal length (and with it, the magnification) increases; the picture gets bigger.
The OPFA units are set up (from right to left) as in the following example:
Refer to the third photo above. The parts marked in blue correspond to the OPFA-4 basic version, which has a male T-2-thread on the with camera side and a female T-2-thread on the telescope side. Each OPFA (model 1-3 and 5-7) has got another telescope adapter included in the scope of delivery. In the example, the adapters of OPFA 1 and 2 are shown in green. The parts marked in red are not included in any OPFA!
The unit starts on the telescope side, i.e. on the focuser (to the right). Shown in the picture are OPFA-1 (1¼" nosepiece) and OPFA-2 (2" nosepiece). If your focuser has a different connector, you have to choose between OPFA-3 and OPFA-7 (e.g. OPFA-3 for Celestron and Meade Schmidt-Cassegrain telescopes).
This is followed by a sliding focuser with a T-2 locking ring. The 1¼" eyepiece (not supplied) is inserted into this sliding focuser and clamped in. The function of the locking ring and the sliding focuser is described below.
Now, the two 40mm T-2 extension tubes are screwed onto the sliding focuser, the eyepiece (outer diameters of up to 38mm are possible) will be inside of the T-2 extensions. The extensions are used to set the distance between eyepiece and camera (ie to establish the projection distance). By adding more T-2 extensions (see our Astro T2 system), the distance (and the image) can be enlarged.
The OPFA is connected to the (digital) SLR camera through a camera-specific T-ring (not included).
The function of the sliding focuser and the locking ring
The sliding focuser makes a fine adjustment of the projection distance possible a by slightly pushing the eyepiece forward or backward.
By loosening the locking ring, the complete unit can be rotated steplessly, until the attached camera is to set to a favorable orientation. Of course, for the models OPFA-1 and OPFA-2 the camera can also be rotated with the complete unit.
In the models OPFA-3 to OPFA-7, the connection from the OPFA to the focuser is a rigid screw connection. Here, the camera orientation can only be changed via the locking ring of the sliding focuser.
OPFA System Layout
The fourth photo above gives an idea of the flexibility and different configurations possible for use in a standard eyepiece projection setup (see below images for some afocal setups). The OPFA takes advantage of its compatibility with the Astro-T2 System, permitting you to design the exact system to fit your needs. Any 1.25" eyepiece (up to 37mm body diameter) may be used. The eyepiece is securely retained with a separate knurled lock screw.
The OPFA incorporates a novel sliding focuser assembly (#24), which permits you easily vary the distance between the eyepiece and camera (total travel of 12mm). Simply loosen the lock screw, adjust the focus tube, and securely lock in place at the desired position. Additional distances can be achieved by the use of any of our Extension Tubes (two 40mm extension tubes #25B are supplied as part of the OPFA). This feature is particularly valuable in matching the eyepiece-to-lens distance for afocal projection systems (see below for some images of several digital cameras setup for afocal projection imaging).
Each OPFA is a complete accessory set for focal photography and eyepiece projection (without projection eyepiece and without T-2-ring for the camera) with connection to the telescope, sliding focuser and 2 pieces of 40mm T-2 extension tubes. A suitable T-2-ring for your camera must be ordered separately.
The OPFA projection systems can be set to be light-tight and bolt-tight, so nothing can wobble anymore. With additional T-2 extension tubes, even extreme projection scales can be achieved – even with CCD cameras!
Each eyepiece projection works in the same way, although there are some practical differences whether the camera is used WITH or WITHOUT lens. When working with a (digital) SLR camera, the lens is usually removed, and the camera body is attached directly to the projection unit.
If the camera lens is integrated into the system, this is called afocal projection. This is the usual method when shooting with digital viewfinder cameras, where the lens can NOT be removed. For these cameras, we recommend the ADPS, which can be set to a short distance between eyepiece and camera lens. The following diagram shows the structure of the classic eyepiece projection with cameras, where the lens can be removed.
The focus plane or focal image of the telescope is projected onto the film/camera sensor via a projection eyepiece (similar to a slide projector, which projects the magnified slide onto a screen). The resulting focal length is called the equivalent focal length (fE).
The reproduction scale depends on the focal length of the eyepiece (fEP) and the projection distance (a). The equivalent focal length is calculated as follows (the longer it gets, the bigger the image on the film becomes):
f_E = fprimary × ((a ÷ fEP) - 1)
The effect of the different parameters can easily be seen from the formula. If the eyepiece focal length is reduced and / or the distance a (between focal point of the eyepiece and the camera sensor/film) is increased, the value of the equivalent focal length (and with it, the magnification) increases; the picture gets bigger.
The OPFA units are set up (from right to left) as in the following example:
Refer to the third photo above. The parts marked in blue correspond to the OPFA-4 basic version, which has a male T-2-thread on the with camera side and a female T-2-thread on the telescope side. Each OPFA (model 1-3 and 5-7) has got another telescope adapter included in the scope of delivery. In the example, the adapters of OPFA 1 and 2 are shown in green. The parts marked in red are not included in any OPFA!
The unit starts on the telescope side, i.e. on the focuser (to the right). Shown in the picture are OPFA-1 (1¼" nosepiece) and OPFA-2 (2" nosepiece). If your focuser has a different connector, you have to choose between OPFA-3 and OPFA-7 (e.g. OPFA-3 for Celestron and Meade Schmidt-Cassegrain telescopes).
This is followed by a sliding focuser with a T-2 locking ring. The 1¼" eyepiece (not supplied) is inserted into this sliding focuser and clamped in. The function of the locking ring and the sliding focuser is described below.
Now, the two 40mm T-2 extension tubes are screwed onto the sliding focuser, the eyepiece (outer diameters of up to 38mm are possible) will be inside of the T-2 extensions. The extensions are used to set the distance between eyepiece and camera (ie to establish the projection distance). By adding more T-2 extensions (see our Astro T2 system), the distance (and the image) can be enlarged.
The OPFA is connected to the (digital) SLR camera through a camera-specific T-ring (not included).
The function of the sliding focuser and the locking ring
The sliding focuser makes a fine adjustment of the projection distance possible a by slightly pushing the eyepiece forward or backward.
By loosening the locking ring, the complete unit can be rotated steplessly, until the attached camera is to set to a favorable orientation. Of course, for the models OPFA-1 and OPFA-2 the camera can also be rotated with the complete unit.
In the models OPFA-3 to OPFA-7, the connection from the OPFA to the focuser is a rigid screw connection. Here, the camera orientation can only be changed via the locking ring of the sliding focuser.
OPFA System Layout
The fourth photo above gives an idea of the flexibility and different configurations possible for use in a standard eyepiece projection setup (see below images for some afocal setups). The OPFA takes advantage of its compatibility with the Astro-T2 System, permitting you to design the exact system to fit your needs. Any 1.25" eyepiece (up to 37mm body diameter) may be used. The eyepiece is securely retained with a separate knurled lock screw.
The OPFA incorporates a novel sliding focuser assembly (#24), which permits you easily vary the distance between the eyepiece and camera (total travel of 12mm). Simply loosen the lock screw, adjust the focus tube, and securely lock in place at the desired position. Additional distances can be achieved by the use of any of our Extension Tubes (two 40mm extension tubes #25B are supplied as part of the OPFA). This feature is particularly valuable in matching the eyepiece-to-lens distance for afocal projection systems (see below for some images of several digital cameras setup for afocal projection imaging).
Useful Resources
For more information about using this item with other Baader components, as well as to see some typical configurations using popular digital cameras in afocal projection, please visit this link.
Other Information
- Country of Manufacture: Germany

Baader Ocular Projection and Focal Adapter System: Available in 7 Configurations