

ZWO Off-Axis Guider with 1.25" Holder and M48 / M42 Threads
Stock count is accurate & shown in real time.
- This item is out of stock.
- Sign up for back-in-stock alerts to be notified when this item becomes available (account login required).
- This item is out of stock.
- Sign up for back-in-stock alerts to be notified when this item becomes available (account login required).
Contiguous US / Lower 48:
Free shipping applies to orders over $50 using our chosen carrier/method. Faster paid options are available at checkout.
Alaska, Hawaii & US Territories:
Free shipping applies to many—but not all—products. Enter your ZIP code in cart or upon checkout to confirm options and costs.
International:
International orders do not qualify for free shipping. Shipping, duties, brokerage, tariffs, and taxes are the customer’s responsibility. Some items may be restricted due to export, size, or manufacturer limitations.
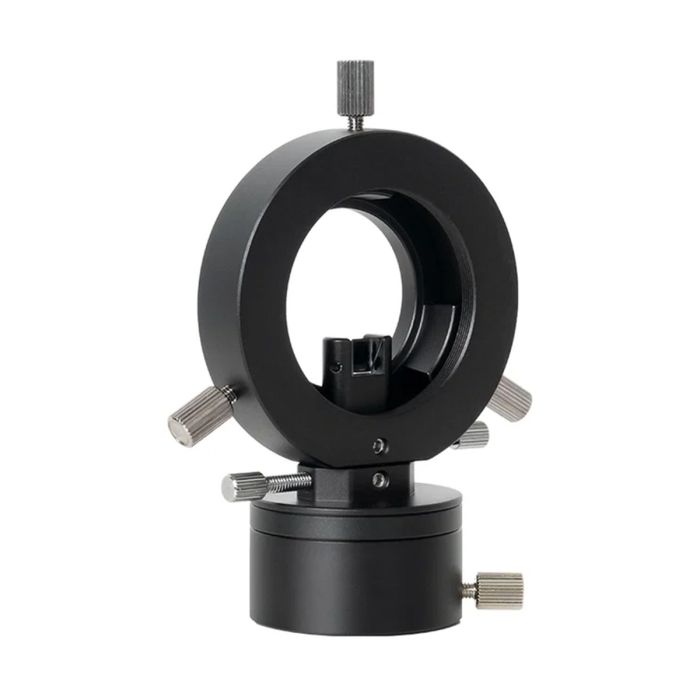
- 8x8 mm guide prism with a 7.4 x 5 mm effective light-passing aperture
- Guides through your main telescope, so no separate guide scope is needed
- 1.25" holder accepts ASI Mini and ZWO lunar/planetary guide cameras
- 5mm T2 extender included for guide cameras with 12.5mm back focus
- Sized for ZWO cooled cameras with APS-C sensors or smaller
- Weighs only 181 g
ZWO Standard Off-Axis Guider
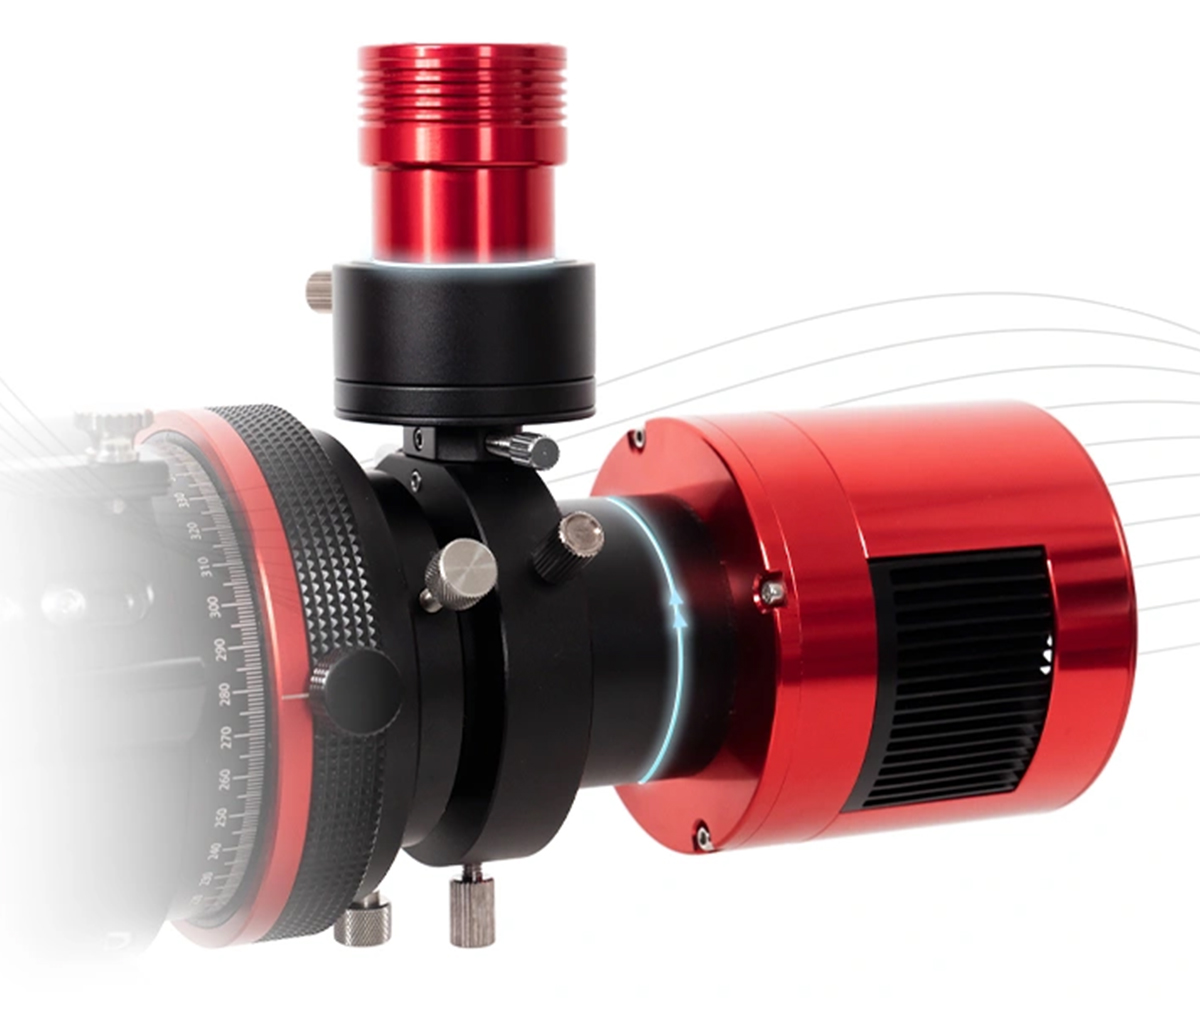
The ZWO OAG is the standard-size off-axis guider in ZWO's lineup. It sits between your telescope and your main camera, and a small prism inside picks off a slice of light near the edge of the field. That light goes to a guide camera mounted on the side. Your main camera never sees the prism, and your guide camera sees the sky through the same optics your images come from.
That shared light path is the whole point. Guiding corrections track the exact optical system you are imaging with, so nothing can drift out of agreement between the two. On telescopes over 1000mm in focal length, that accuracy matters more than it does on a short refractor. This model is built around an 8x8mm prism and a 16.5mm thick body. ZWO recommends it for cooled cameras with APS-C sensors or smaller. If you shoot with a full-frame camera, look at the OAG-L instead, since its larger prism is designed for bigger sensors.
Please enjoy this Informative video by Cuiv the "Lazy Geek" spotlighting the benefits of utilizing an OAG!
Highlights of the ZWO Off-Axis Guider
Slim 16.5mm Body
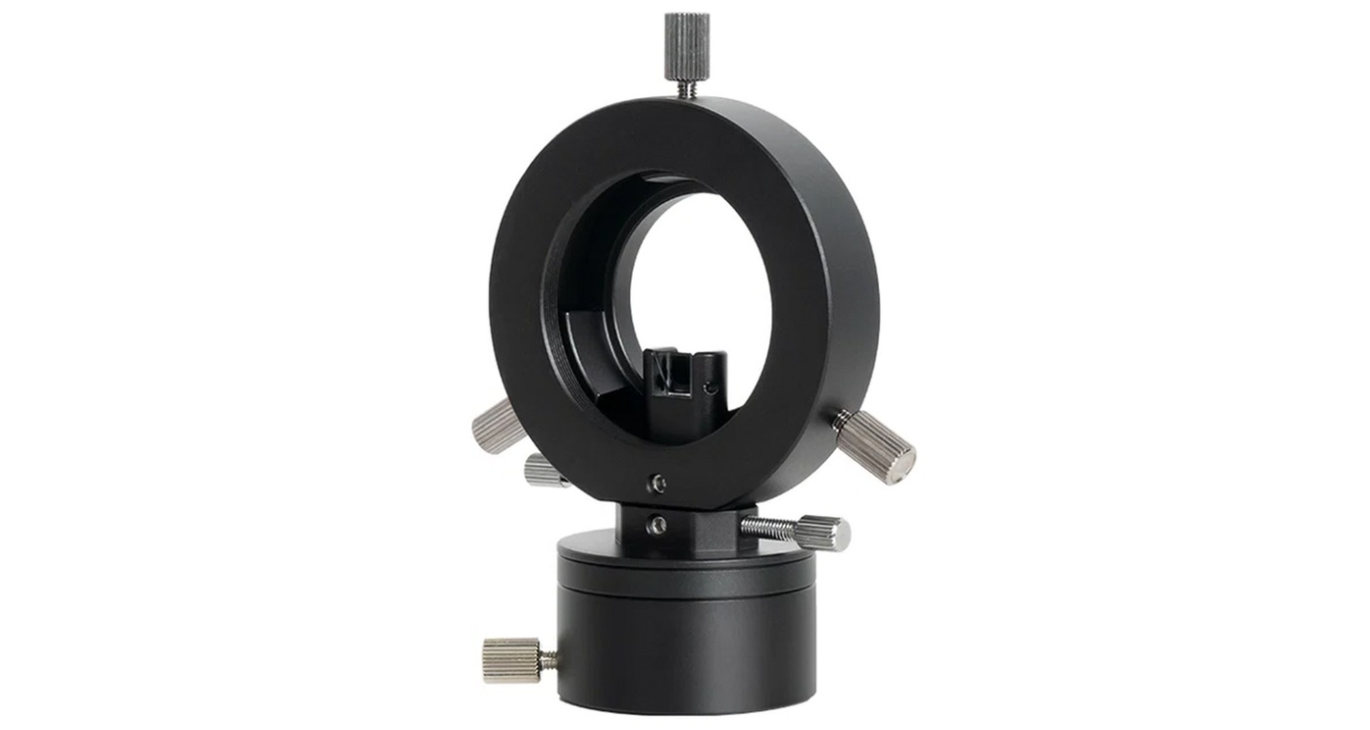
The OAG adds just 16.5mm to your imaging train. That leaves plenty of room to hit a standard 55mm back focus with the rest of your gear.
M42 and M48 Adapters Included
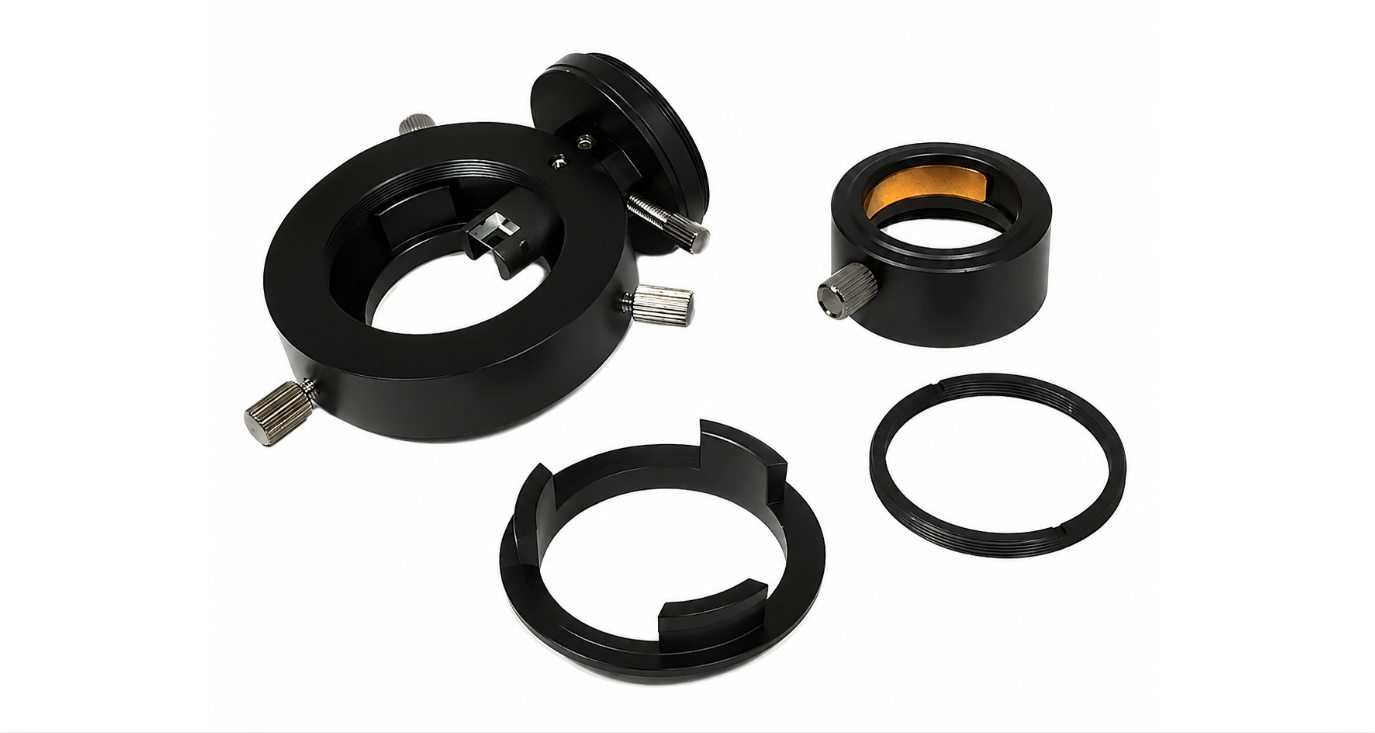
Adapters for both thread sizes come in the box, and they cover the telescope side and the camera side. Most telescopes and ZWO accessories connect without extra parts.
Aluminum Alloy Construction
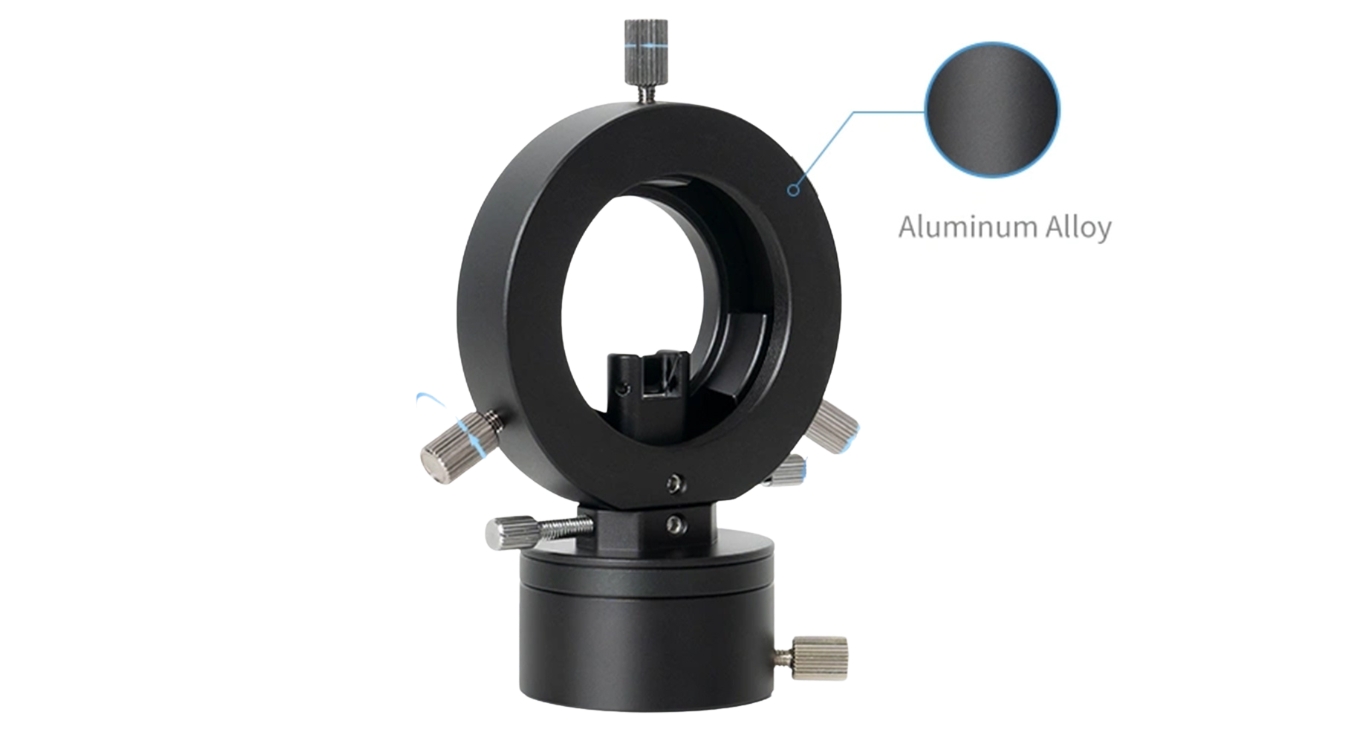
The body is machined from aluminum alloy to stay light without flexing. A set screw locks the prism column in place so it holds its position through a full night.
When To Use Off-Axis Guiding or a Guide Scope
A separate guide scope works fine on short systems, but it runs into trouble as focal length grows. An off-axis guider solves three problems at once. It guides at your telescope's own focal length, which becomes critical past 1000mm. It removes the weight of a second scope and its rings from the rig, so the mount tracks more smoothly.
It also eliminates flexure, which is the small amount of sag that a guide scope develops under its own weight as the mount moves across the sky. The elongated stars often look like the result of poor guiding rather than a mechanical problem, making it an easy error to misdiagnose.
Which Imaging Cameras Work Natively
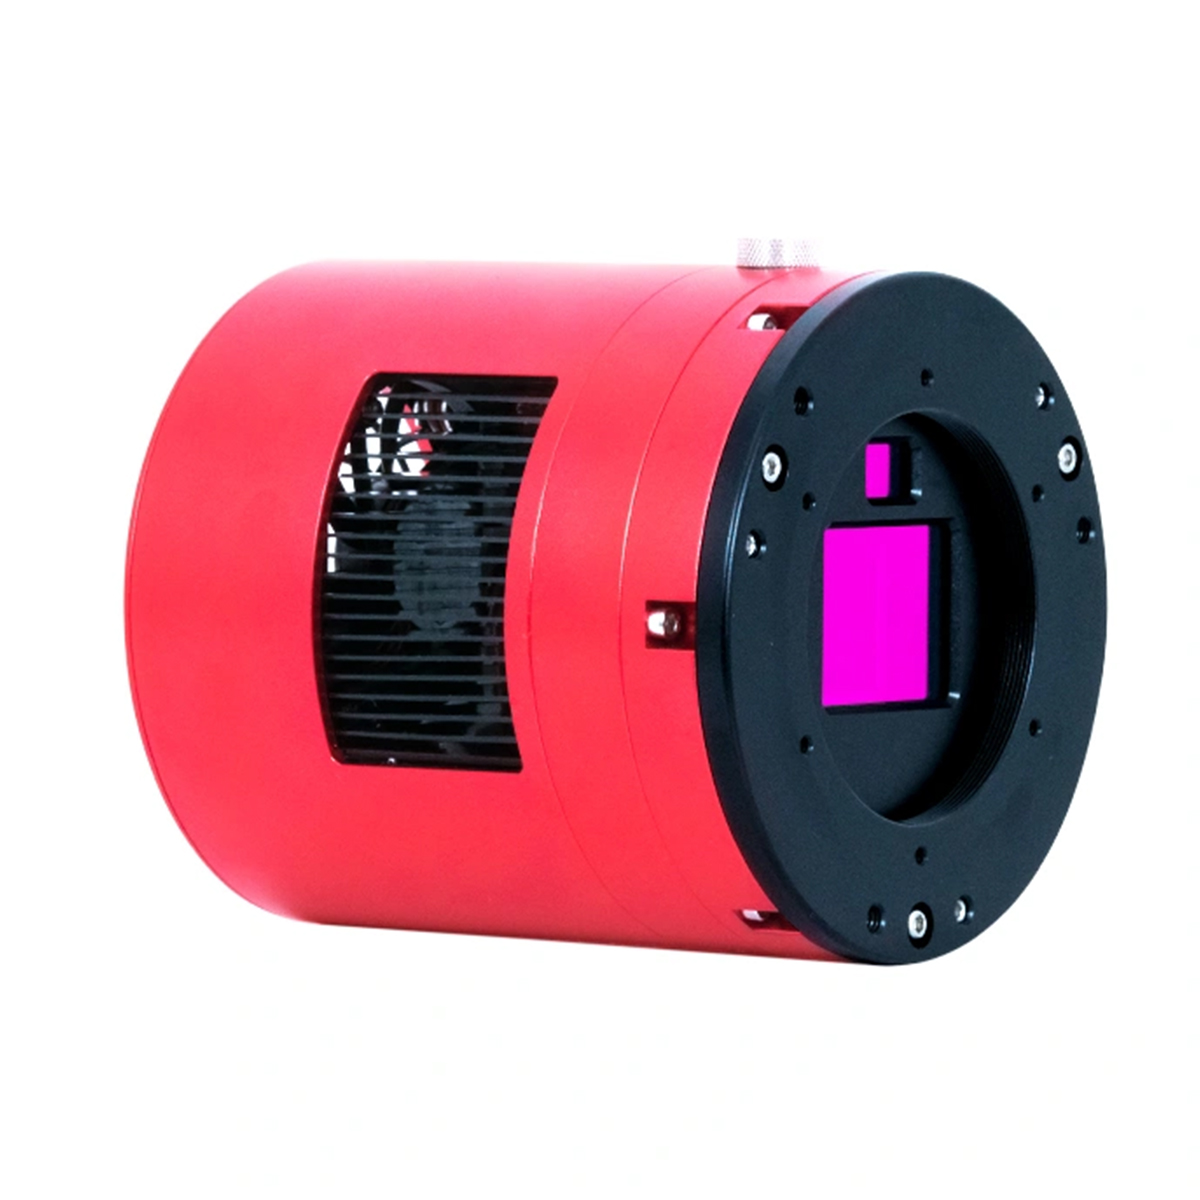
The OAG connects directly to a long list of ZWO cooled cameras with no extra adapters required. Native support covers the ASI2600MC Pro, ASI294MC Pro, ASI294MM Pro, ASI533MC Pro, ASI533MM Pro, ASI183MC Pro, ASI183MM Pro, ASI071MC Pro, ASI1600MM Pro, ASI1600GT, and ASI183GT. All of these use APS-C or smaller sensors, which matches what the 8x8mm prism is designed to serve. Check the connection diagrams on this page to see how your specific camera stacks up.
Please note a camera is not included with the purchase of this OAG.
Guide Camera Options and Back Focus
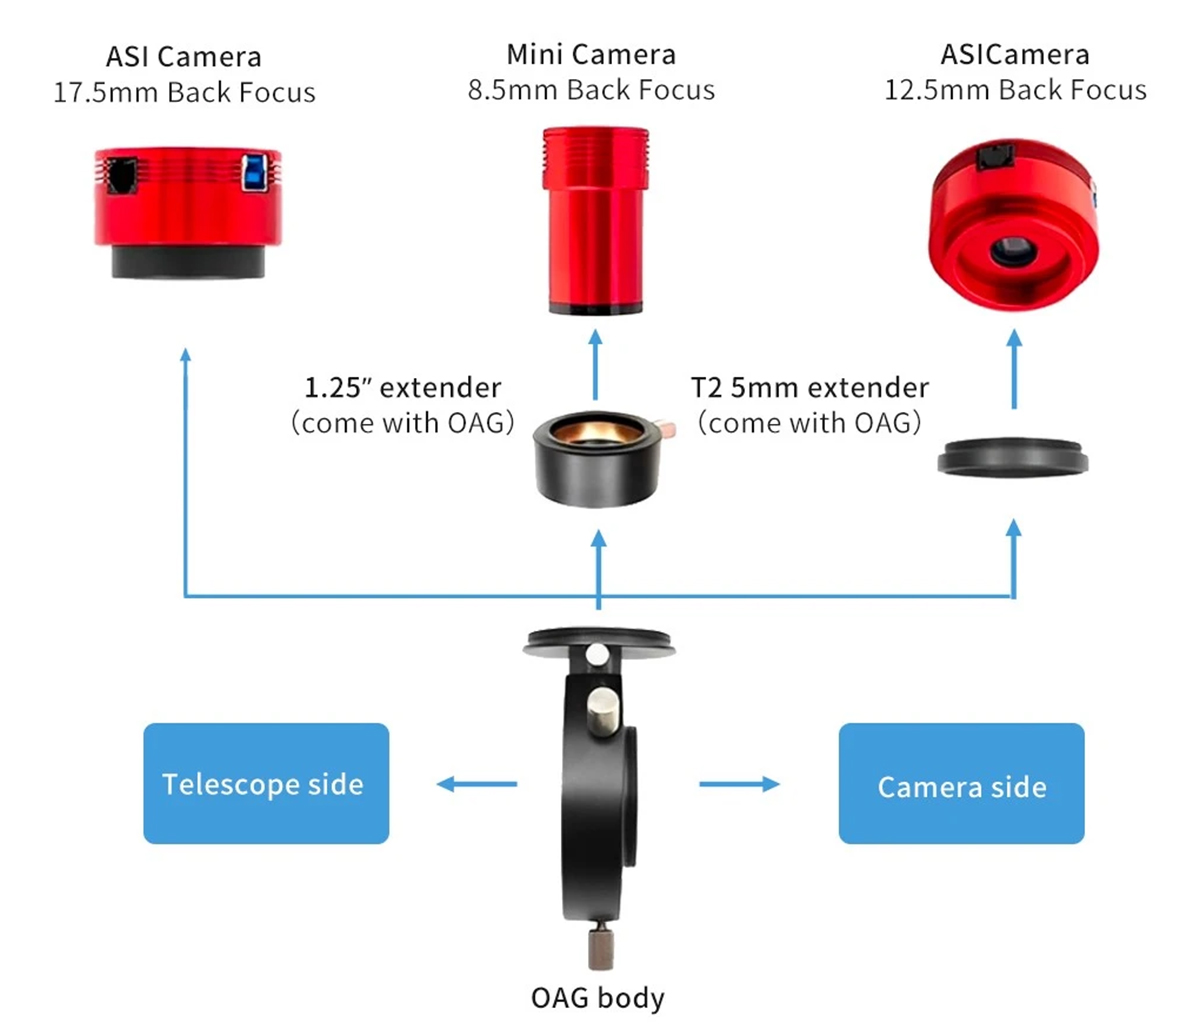
The camera side of the OAG accepts more than one style of ZWO guide camera. ASI Mini cameras work, and so do ZWO lunar and planetary imaging cameras. Different bodies need different back focus distances, so the OAG ships with the parts to make up the difference. The 1.25" holder handles cameras with 1.25" size bodies. The included 5mm T2 extender covers guide cameras that need 12.5mm of back focus, such as the ASI120, ASI224MC, and ASI290. A camera that already needs 17.5mm can mount to the OAG body without an extender at all.
Adding the 1.25" Helical Focuser
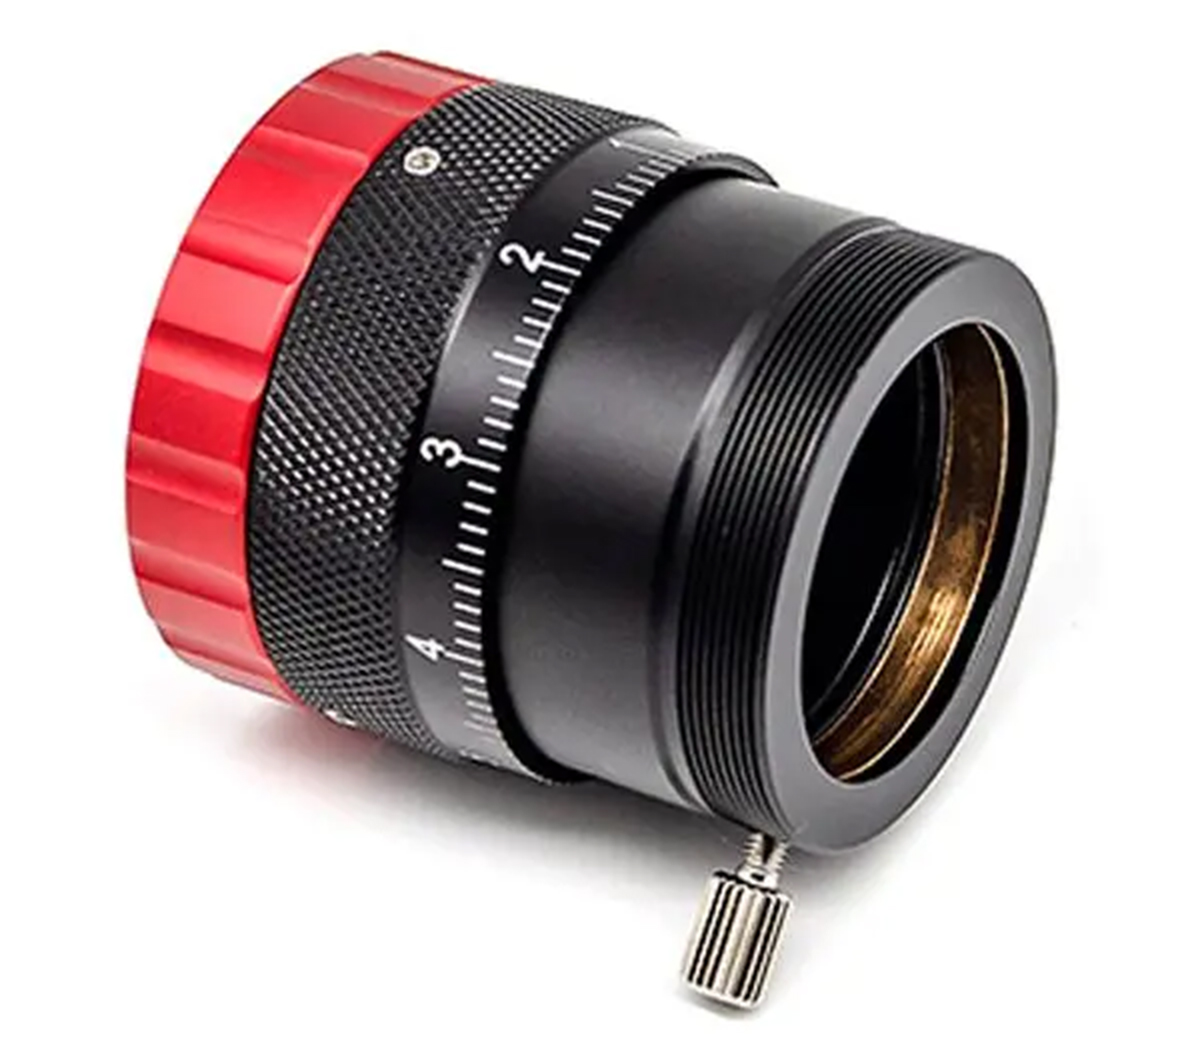
The OAG does not come with a focuser for the guide camera. Out of the box, you focus by sliding the guide camera in and out of the stock tube, which takes patience. The ZWO 1.25" non-rotating helical focuser threads onto the base of the OAG and turns that into a controlled adjustment with 6mm of travel and 0.1mm precision.
It uses M42 x 0.75 threads, male on top and female on the bottom, and adds a minimum height of 48.1mm to the stack. One limitation is worth knowing before you buy: with the helical focuser installed, only ASI Mini cameras will work, and the black nosepiece has to come off first. ZWO planetary cameras without the Mini designation are not compatible with the focuser.
Setting Up Your Imaging Train
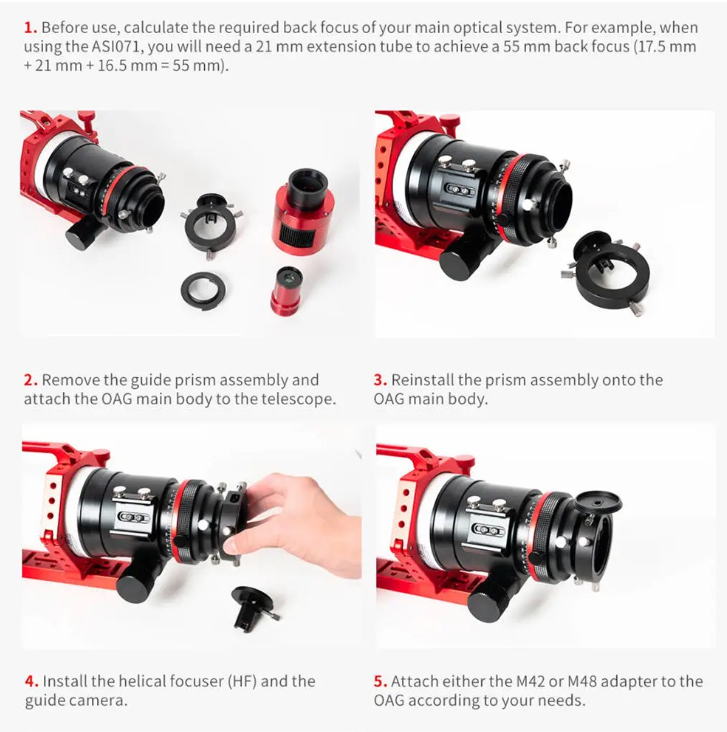
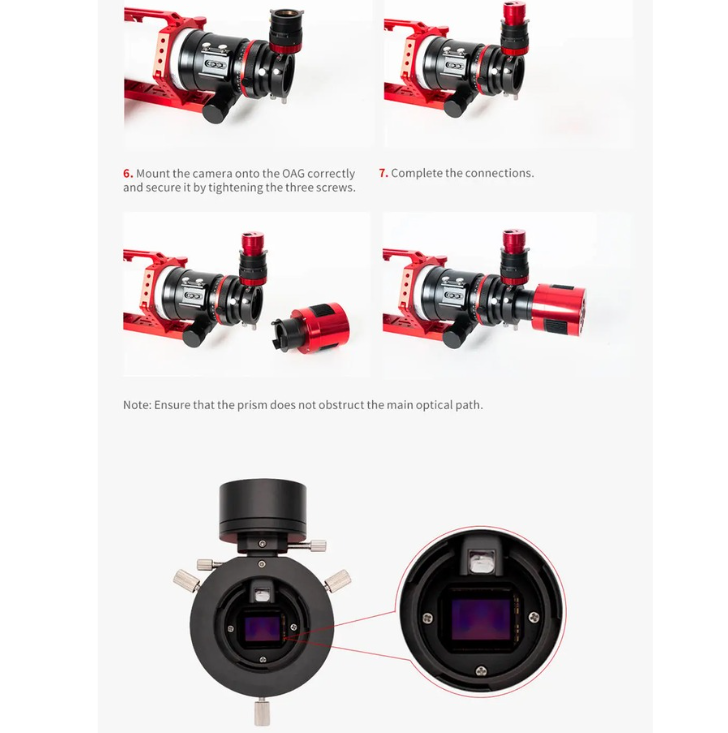
Start by working out the spacing your camera needs before you assemble anything. As an example, an ASI071 needs a 21mm extender to reach 55mm back focus, since 17.5mm plus 21mm plus the OAG's 16.5mm gets you there. Once the math checks out, remove the prism assembly, thread the OAG body onto the telescope, then reinstall the prism. Mount the guide camera, add the T2 or M48 adapter to your imaging camera depending on its threads, seat the camera on the OAG, and lock the three screws. Use the guiding screw to bring the guide camera to focus, and confirm the prism is not intruding on the imaging area.
Specifications
- Prism Size: 8 x 8 mm
- Thickness: 16.5 mm
- Effective Aperture: 7.4 mm x 5 mm
- Sensor Tilt Plate: None
- Compatible Filter Wheels: 1.25" EFW, 2" EFW, 36mm EFW
- Recommended Main Camera: ASI cameras with APS-C sensor size or smaller
- Recommended Guide Camera: ASI Mini camera
- Body Material: Aluminum alloy
- Weight (Net): 181 g
Frequently Asked Questions:
1. What is the difference between the OAG and the OAG-L?
Prism size is the main one. The OAG uses an 8x8mm prism and the OAG-L uses a 12x12mm prism, which is why the larger model is aimed at full-frame sensors. The OAG-L is also slightly thicker at 17.5mm, includes a sensor tilt plate, and has a helical focuser built into the body.
2. Does the OAG include a sensor tilt plate?
No. The standard OAG has no tilt plate. If sensor tilt correction is something you need, that feature is found on the OAG-L and OAG-L-68 models.
3. Which ZWO filter wheels can I use with the OAG?
The OAG works best with ZWO's 1.25" EFW and 36mm EFW. Confirm your spacing after adding a filter wheel, since it changes the total length of the imaging train.
4. Can I use the OAG with a full-frame camera?
No. The 8x8mm prism is sized for APS-C sensors and smaller. A full-frame sensor may see vignetting from the prism, so the OAG-L is the better choice for those cameras.
5. What does "effective aperture" mean on the spec sheet?
It describes the actual area of light the prism passes to your guide camera, listed here as 7.4mm x 5mm. That number is smaller than the physical prism because the mounting hardware blocks the outer edges. A larger effective aperture makes it easier to catch a usable guide star.
Useful Resources
Usage Guide:
1. Please calculate the correct required distance for your imaging train at first.
(As an example, you need to attach a 21mm extender to an ASI071 to reach 55mm back focus. Distance: 17.5mm + 21mm + 16.5mm = 55mm)
2. Take off the guider prism part and attach the OAG body to the telescope.

3. Insert the prism part into the OAG body
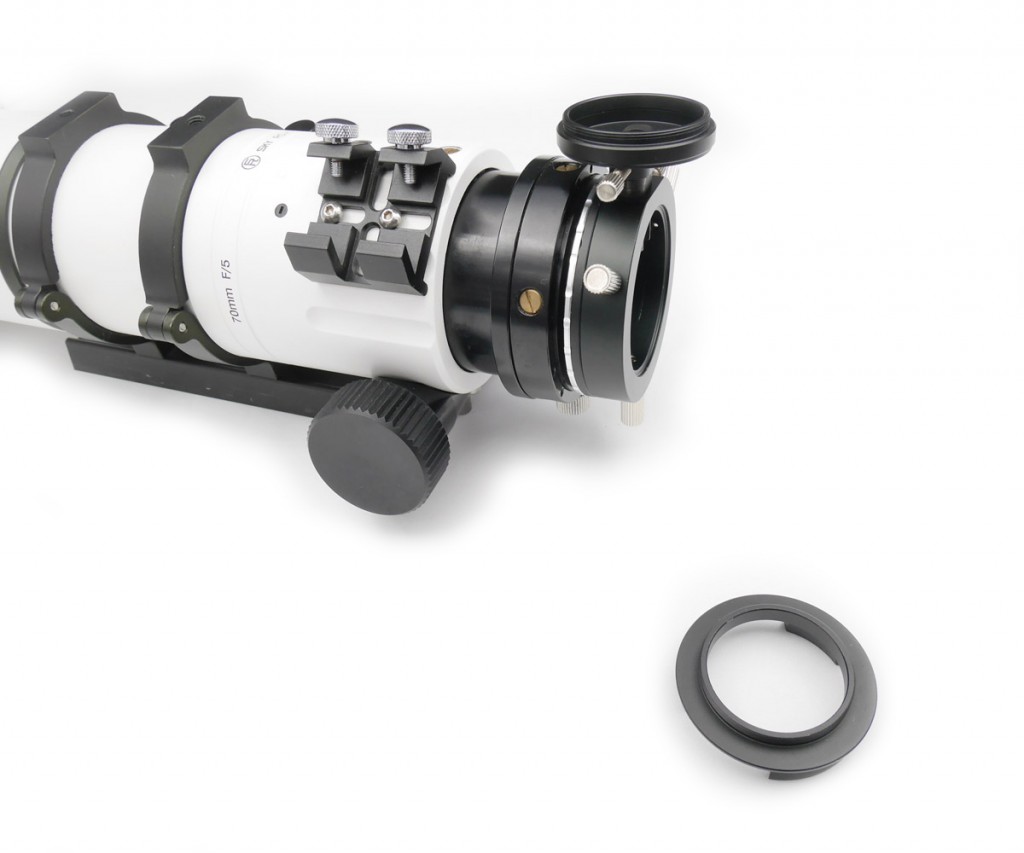
4. Mount the guide camera
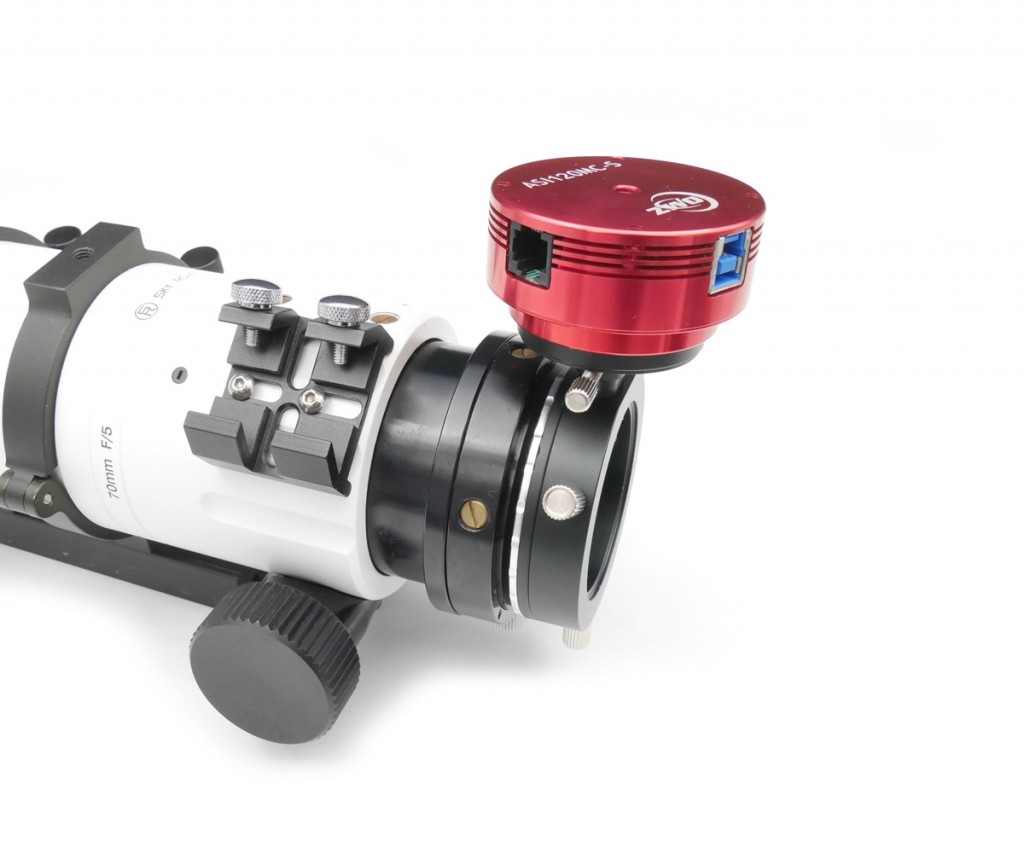
5. Screw the T2 or M48 adapter on the imaging camera according to your mounting type

6. Mount the camera on the OAG in the correct position and lock the 3 screws.

7. The final setup

Note: Please make sure that the prism doesn't block the imaging area

Use the guiding screw to adjust the guiding camera's focus
It is recommended to do this during the day to assure that the imaging and guiding camera can reach focus at the same position.
Other Information
- Country of Manufacture: China
ZWO Standard Off-Axis Guider
The ZWO OAG is the standard-size off-axis guider in ZWO's lineup. It sits between your telescope and your main camera, and a small prism inside picks off a slice of light near the edge of the field. That light goes to a guide camera mounted on the side. Your main camera never sees the prism, and your guide camera sees the sky through the same optics your images come from.
That shared light path is the whole point. Guiding corrections track the exact optical system you are imaging with, so nothing can drift out of agreement between the two. On telescopes over 1000mm in focal length, that accuracy matters more than it does on a short refractor. This model is built around an 8x8mm prism and a 16.5mm thick body. ZWO recommends it for cooled cameras with APS-C sensors or smaller. If you shoot with a full-frame camera, look at the OAG-L instead, since its larger prism is designed for bigger sensors.
Please enjoy this Informative video by Cuiv the "Lazy Geek" spotlighting the benefits of utilizing an OAG!
Highlights of the ZWO Off-Axis Guider
Slim 16.5mm Body
The OAG adds just 16.5mm to your imaging train. That leaves plenty of room to hit a standard 55mm back focus with the rest of your gear.
M42 and M48 Adapters Included
Adapters for both thread sizes come in the box, and they cover the telescope side and the camera side. Most telescopes and ZWO accessories connect without extra parts.
Aluminum Alloy Construction
The body is machined from aluminum alloy to stay light without flexing. A set screw locks the prism column in place so it holds its position through a full night.
When To Use Off-Axis Guiding or a Guide Scope
A separate guide scope works fine on short systems, but it runs into trouble as focal length grows. An off-axis guider solves three problems at once. It guides at your telescope's own focal length, which becomes critical past 1000mm. It removes the weight of a second scope and its rings from the rig, so the mount tracks more smoothly.
It also eliminates flexure, which is the small amount of sag that a guide scope develops under its own weight as the mount moves across the sky. The elongated stars often look like the result of poor guiding rather than a mechanical problem, making it an easy error to misdiagnose.
Which Imaging Cameras Work Natively
The OAG connects directly to a long list of ZWO cooled cameras with no extra adapters required. Native support covers the ASI2600MC Pro, ASI294MC Pro, ASI294MM Pro, ASI533MC Pro, ASI533MM Pro, ASI183MC Pro, ASI183MM Pro, ASI071MC Pro, ASI1600MM Pro, ASI1600GT, and ASI183GT. All of these use APS-C or smaller sensors, which matches what the 8x8mm prism is designed to serve. Check the connection diagrams on this page to see how your specific camera stacks up.
Please note a camera is not included with the purchase of this OAG.
Guide Camera Options and Back Focus
The camera side of the OAG accepts more than one style of ZWO guide camera. ASI Mini cameras work, and so do ZWO lunar and planetary imaging cameras. Different bodies need different back focus distances, so the OAG ships with the parts to make up the difference. The 1.25" holder handles cameras with 1.25" size bodies. The included 5mm T2 extender covers guide cameras that need 12.5mm of back focus, such as the ASI120, ASI224MC, and ASI290. A camera that already needs 17.5mm can mount to the OAG body without an extender at all.
Adding the 1.25" Helical Focuser
The OAG does not come with a focuser for the guide camera. Out of the box, you focus by sliding the guide camera in and out of the stock tube, which takes patience. The ZWO 1.25" non-rotating helical focuser threads onto the base of the OAG and turns that into a controlled adjustment with 6mm of travel and 0.1mm precision.
It uses M42 x 0.75 threads, male on top and female on the bottom, and adds a minimum height of 48.1mm to the stack. One limitation is worth knowing before you buy: with the helical focuser installed, only ASI Mini cameras will work, and the black nosepiece has to come off first. ZWO planetary cameras without the Mini designation are not compatible with the focuser.
Setting Up Your Imaging Train
Start by working out the spacing your camera needs before you assemble anything. As an example, an ASI071 needs a 21mm extender to reach 55mm back focus, since 17.5mm plus 21mm plus the OAG's 16.5mm gets you there. Once the math checks out, remove the prism assembly, thread the OAG body onto the telescope, then reinstall the prism. Mount the guide camera, add the T2 or M48 adapter to your imaging camera depending on its threads, seat the camera on the OAG, and lock the three screws. Use the guiding screw to bring the guide camera to focus, and confirm the prism is not intruding on the imaging area.
Specifications
- Prism Size: 8 x 8 mm
- Thickness: 16.5 mm
- Effective Aperture: 7.4 mm x 5 mm
- Sensor Tilt Plate: None
- Compatible Filter Wheels: 1.25" EFW, 2" EFW, 36mm EFW
- Recommended Main Camera: ASI cameras with APS-C sensor size or smaller
- Recommended Guide Camera: ASI Mini camera
- Body Material: Aluminum alloy
- Weight (Net): 181 g
Frequently Asked Questions:
1. What is the difference between the OAG and the OAG-L?
Prism size is the main one. The OAG uses an 8x8mm prism and the OAG-L uses a 12x12mm prism, which is why the larger model is aimed at full-frame sensors. The OAG-L is also slightly thicker at 17.5mm, includes a sensor tilt plate, and has a helical focuser built into the body.
2. Does the OAG include a sensor tilt plate?
No. The standard OAG has no tilt plate. If sensor tilt correction is something you need, that feature is found on the OAG-L and OAG-L-68 models.
3. Which ZWO filter wheels can I use with the OAG?
The OAG works best with ZWO's 1.25" EFW and 36mm EFW. Confirm your spacing after adding a filter wheel, since it changes the total length of the imaging train.
4. Can I use the OAG with a full-frame camera?
No. The 8x8mm prism is sized for APS-C sensors and smaller. A full-frame sensor may see vignetting from the prism, so the OAG-L is the better choice for those cameras.
5. What does "effective aperture" mean on the spec sheet?
It describes the actual area of light the prism passes to your guide camera, listed here as 7.4mm x 5mm. That number is smaller than the physical prism because the mounting hardware blocks the outer edges. A larger effective aperture makes it easier to catch a usable guide star.
- 1x OAG main body with M48 telescope adapter
- 1x 1.25" holder for 1.25" body guide cameras
- 1x 5mm T2 extender
- 1x M48 to M42 adapter
- 1x M48 adapter for the main imaging camera
- 1x M42 adapter for the main imaging camera
- 1x M42 adapter for the telescope side
- 1x Spacer
- 1x Hex key
A Note on the Prism Glue Marks:
The guide prism is held to its holder with small dabs of adhesive at the corners. Those dabs leave visible black marks on the upper surface of the prism, and nearly every unit shows them. They are not a defect and they do not mean the prism was damaged in shipping. The adhesive sits outside the light path, so it has no effect on the image or on guiding performance.

- 8x8 mm guide prism with a 7.4 x 5 mm effective light-passing aperture
- Guides through your main telescope, so no separate guide scope is needed
- 1.25" holder accepts ASI Mini and ZWO lunar/planetary guide cameras
- 5mm T2 extender included for guide cameras with 12.5mm back focus
- Sized for ZWO cooled cameras with APS-C sensors or smaller
- Weighs only 181 g
ZWO Standard Off-Axis Guider
The ZWO OAG is the standard-size off-axis guider in ZWO's lineup. It sits between your telescope and your main camera, and a small prism inside picks off a slice of light near the edge of the field. That light goes to a guide camera mounted on the side. Your main camera never sees the prism, and your guide camera sees the sky through the same optics your images come from.
That shared light path is the whole point. Guiding corrections track the exact optical system you are imaging with, so nothing can drift out of agreement between the two. On telescopes over 1000mm in focal length, that accuracy matters more than it does on a short refractor. This model is built around an 8x8mm prism and a 16.5mm thick body. ZWO recommends it for cooled cameras with APS-C sensors or smaller. If you shoot with a full-frame camera, look at the OAG-L instead, since its larger prism is designed for bigger sensors.
Please enjoy this Informative video by Cuiv the "Lazy Geek" spotlighting the benefits of utilizing an OAG!
Highlights of the ZWO Off-Axis Guider
Slim 16.5mm Body
The OAG adds just 16.5mm to your imaging train. That leaves plenty of room to hit a standard 55mm back focus with the rest of your gear.
M42 and M48 Adapters Included
Adapters for both thread sizes come in the box, and they cover the telescope side and the camera side. Most telescopes and ZWO accessories connect without extra parts.
Aluminum Alloy Construction
The body is machined from aluminum alloy to stay light without flexing. A set screw locks the prism column in place so it holds its position through a full night.
When To Use Off-Axis Guiding or a Guide Scope
A separate guide scope works fine on short systems, but it runs into trouble as focal length grows. An off-axis guider solves three problems at once. It guides at your telescope's own focal length, which becomes critical past 1000mm. It removes the weight of a second scope and its rings from the rig, so the mount tracks more smoothly.
It also eliminates flexure, which is the small amount of sag that a guide scope develops under its own weight as the mount moves across the sky. The elongated stars often look like the result of poor guiding rather than a mechanical problem, making it an easy error to misdiagnose.
Which Imaging Cameras Work Natively
The OAG connects directly to a long list of ZWO cooled cameras with no extra adapters required. Native support covers the ASI2600MC Pro, ASI294MC Pro, ASI294MM Pro, ASI533MC Pro, ASI533MM Pro, ASI183MC Pro, ASI183MM Pro, ASI071MC Pro, ASI1600MM Pro, ASI1600GT, and ASI183GT. All of these use APS-C or smaller sensors, which matches what the 8x8mm prism is designed to serve. Check the connection diagrams on this page to see how your specific camera stacks up.
Please note a camera is not included with the purchase of this OAG.
Guide Camera Options and Back Focus
The camera side of the OAG accepts more than one style of ZWO guide camera. ASI Mini cameras work, and so do ZWO lunar and planetary imaging cameras. Different bodies need different back focus distances, so the OAG ships with the parts to make up the difference. The 1.25" holder handles cameras with 1.25" size bodies. The included 5mm T2 extender covers guide cameras that need 12.5mm of back focus, such as the ASI120, ASI224MC, and ASI290. A camera that already needs 17.5mm can mount to the OAG body without an extender at all.
Adding the 1.25" Helical Focuser
The OAG does not come with a focuser for the guide camera. Out of the box, you focus by sliding the guide camera in and out of the stock tube, which takes patience. The ZWO 1.25" non-rotating helical focuser threads onto the base of the OAG and turns that into a controlled adjustment with 6mm of travel and 0.1mm precision.
It uses M42 x 0.75 threads, male on top and female on the bottom, and adds a minimum height of 48.1mm to the stack. One limitation is worth knowing before you buy: with the helical focuser installed, only ASI Mini cameras will work, and the black nosepiece has to come off first. ZWO planetary cameras without the Mini designation are not compatible with the focuser.
Setting Up Your Imaging Train
Start by working out the spacing your camera needs before you assemble anything. As an example, an ASI071 needs a 21mm extender to reach 55mm back focus, since 17.5mm plus 21mm plus the OAG's 16.5mm gets you there. Once the math checks out, remove the prism assembly, thread the OAG body onto the telescope, then reinstall the prism. Mount the guide camera, add the T2 or M48 adapter to your imaging camera depending on its threads, seat the camera on the OAG, and lock the three screws. Use the guiding screw to bring the guide camera to focus, and confirm the prism is not intruding on the imaging area.
Specifications
- Prism Size: 8 x 8 mm
- Thickness: 16.5 mm
- Effective Aperture: 7.4 mm x 5 mm
- Sensor Tilt Plate: None
- Compatible Filter Wheels: 1.25" EFW, 2" EFW, 36mm EFW
- Recommended Main Camera: ASI cameras with APS-C sensor size or smaller
- Recommended Guide Camera: ASI Mini camera
- Body Material: Aluminum alloy
- Weight (Net): 181 g
Frequently Asked Questions:
1. What is the difference between the OAG and the OAG-L?
Prism size is the main one. The OAG uses an 8x8mm prism and the OAG-L uses a 12x12mm prism, which is why the larger model is aimed at full-frame sensors. The OAG-L is also slightly thicker at 17.5mm, includes a sensor tilt plate, and has a helical focuser built into the body.
2. Does the OAG include a sensor tilt plate?
No. The standard OAG has no tilt plate. If sensor tilt correction is something you need, that feature is found on the OAG-L and OAG-L-68 models.
3. Which ZWO filter wheels can I use with the OAG?
The OAG works best with ZWO's 1.25" EFW and 36mm EFW. Confirm your spacing after adding a filter wheel, since it changes the total length of the imaging train.
4. Can I use the OAG with a full-frame camera?
No. The 8x8mm prism is sized for APS-C sensors and smaller. A full-frame sensor may see vignetting from the prism, so the OAG-L is the better choice for those cameras.
5. What does "effective aperture" mean on the spec sheet?
It describes the actual area of light the prism passes to your guide camera, listed here as 7.4mm x 5mm. That number is smaller than the physical prism because the mounting hardware blocks the outer edges. A larger effective aperture makes it easier to catch a usable guide star.
Useful Resources
Usage Guide:
1. Please calculate the correct required distance for your imaging train at first.
(As an example, you need to attach a 21mm extender to an ASI071 to reach 55mm back focus. Distance: 17.5mm + 21mm + 16.5mm = 55mm)
2. Take off the guider prism part and attach the OAG body to the telescope.
3. Insert the prism part into the OAG body
4. Mount the guide camera
5. Screw the T2 or M48 adapter on the imaging camera according to your mounting type
6. Mount the camera on the OAG in the correct position and lock the 3 screws.
7. The final setup
Note: Please make sure that the prism doesn't block the imaging area
Use the guiding screw to adjust the guiding camera's focus
It is recommended to do this during the day to assure that the imaging and guiding camera can reach focus at the same position.
Other Information
- Country of Manufacture: China
- 1x OAG main body with M48 telescope adapter
- 1x 1.25" holder for 1.25" body guide cameras
- 1x 5mm T2 extender
- 1x M48 to M42 adapter
- 1x M48 adapter for the main imaging camera
- 1x M42 adapter for the main imaging camera
- 1x M42 adapter for the telescope side
- 1x Spacer
- 1x Hex key
A Note on the Prism Glue Marks:
The guide prism is held to its holder with small dabs of adhesive at the corners. Those dabs leave visible black marks on the upper surface of the prism, and nearly every unit shows them. They are not a defect and they do not mean the prism was damaged in shipping. The adhesive sits outside the light path, so it has no effect on the image or on guiding performance.

ZWO Off-Axis Guider with 1.25" Holder and M48 / M42 Threads