Choosing a Magnifying Finder Scope for Your Telescope
- 1. Overview
- 2. The Basics of Magnifying Finders
- 3. Straight-Through Finder Scopes
- 4. Right-Angle, Right Angle Erect-Image, and Right-Angle Correct-Image (RACI) Finder Scopes
- 5. Finder Reticles and Illuminators
- 6. Guide Scopes and Large-Aperture Finder Scopes
- 7. Finder Brackets, Rings, and Mounting Options
- 8. Summary
- 9. Explore Magnifying Finders At Agena AstroProducts
1. Overview
A finderscope is a small wide-field telescope mounted on a larger telescope that helps an observer quickly aim at terrestrial or celestial objects. Because of their light gathering capacity, finder scopes are especially useful for finding faint celestial objects that cannot be seen with the unaided eye using non-magnifying finders such as a Telrad or red dot finder. Many telescopes come only with a non-magnifying finder, while others come with a simple low-cost, low-aperture finder scope that gives dim, inverted views that make it difficult to use. Whether you are looking to add a magnifying finder to your telescope or upgrade your present finder scope, this article will guide you through options for selecting the right product for your telescope.
2. The Basics of Magnifying Finders
Magnifying finders are simple refractor telescopes. They usually have an achromatic objective lens and a single non-removable eyepiece that gives a fixed magnification. Apertures of finder objective lenses typically range from 30mm to 80mm, and the scopes themselves have a magnification of 6x to 12x. Finders, like binoculars, are described in terms of their aperture and magnification. So an 8x50 finder has, for example, a magnification of 8x and an objective lens with a diameter of 50mm.
The minimum useful aperture for an astronomy finderscope is about 30mm, but most experienced amateur astronomers select finders with larger objectives. Larger finders allow the detection of fainter objects and give brighter views of stars that help you navigate your telescope to even fainter objects. For example, a 50mm objective, which is perhaps the most common aperture for a finder scope, can easily show stars and deep-sky objects down to 9th magnitude from dark observing locations. A quality finder scope with a 50mm objective and a magnification of 7-9x is an excellent upgrade for many telescopes and may be the only magnifying finder you ever need.

Most high-quality finder scopes have objectives that are multi-coated to reduce reflections and increase image brightness. The edge of the objective is also blackened to further improve contrast. Most also have a dew shield surrounding the objective to prevent dew formation on the lens.
Most importantly, finderscopes have wide fields of view of 5° o to 7° compared to the
While nearly all finder scopes are simple refractors, there are three main variations in design that can be matched to the type of main telescope and to the preferences of the observer. These variations are straight-through finders, right-angle finders, and right-angle correct-image (RACI) finders. They are all covered in the following sections.
3. Straight-Through Finder Scopes
The simplest type of magnifying finder scope uses an objective lens and an eyepiece. It's called a straight-through finder because you look directly through it along its optical axis. The objective lens produces an inverted image, so when you move your telescope up, for example, the image in the finder moves down. Move the telescope right, and the image in the finder moves left. This can make navigation around the sky a little trickier for beginners. Most observers get used to this inverted image after a few nights of practice. Nearly all finders were made this way in the earlier days of amateur astronomy, and because of their simplicity, they are typically the lowest-cost type of finderscope.
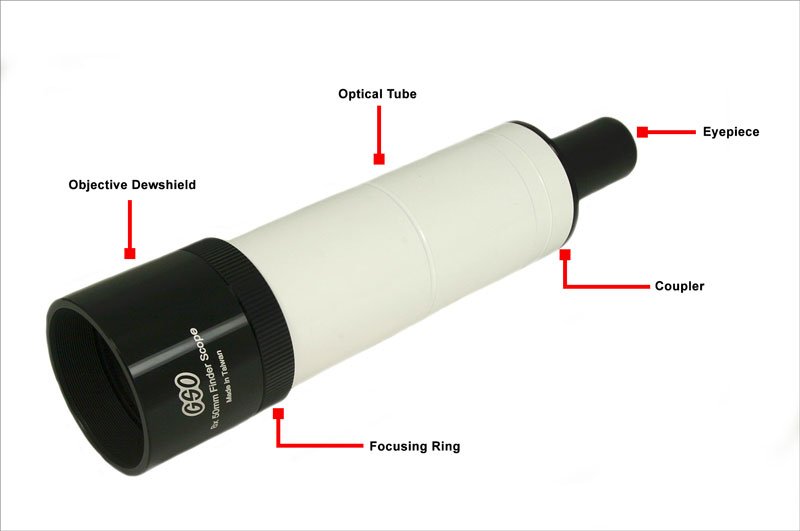
Figures3.1 – 3.3 show the main components of three straight-through astronomical finder scopes. Figure 3.1 shows a scope, manufactured by GSO of Taiwan, with a 50mm achromatic objective lens mounted in a cell inside the objective dewshield. To focus this finder, the user must loosen a focus lock ring behind the dewshield, then rotate the dewshield containing the objective lens in or out to achieve image focus, and finally lock the dewshield in place again with the ring. This is an example of a front-focused (or objective-focused) finder. The eyepiece in this telescope is fixed in place and cannot be focused or swapped out for another eyepiece.
Other finder scopes are focused not by moving the objective or dewshield but by focusing the eyepiece or by using a separate helical focusing mechanism which holds the eyepiece. Still others have a push-pull mechanism in which the eyepiece is manually positioned to achieve focus. These are examples of rear-focused finders. Figure 3.2below shows a rear-focused straight-through finder with a focusable eyepiece, and Figure 3.3below shows a rear-focused finder with a helical focuser which accepts interchangeable 1.25" eyepieces.


Straight-through finders are easy enough to use on most telescopes when you are aiming at objects near the horizon or up to modest elevations. They are most intuitive and easy to look through when used with refractors or Schmidt-Cassegrain or Maksutov-Cassegrain telescopes. When used with Newtonians, they can be a little more cumbersome to use because you have to lay your head along the length of the telescope tube to see through the finder. And on any telescope, when you aim upward towards the zenith, it may become difficult to look through the eyepiece of a straight-through finder without taking an awkward and uncomfortable position to get your eye and body in the right position to peer through the finder.
4. Right-Angle, Right Angle Erect-Image, and Right-Angle Correct-Image (RACI) Finder Scopes
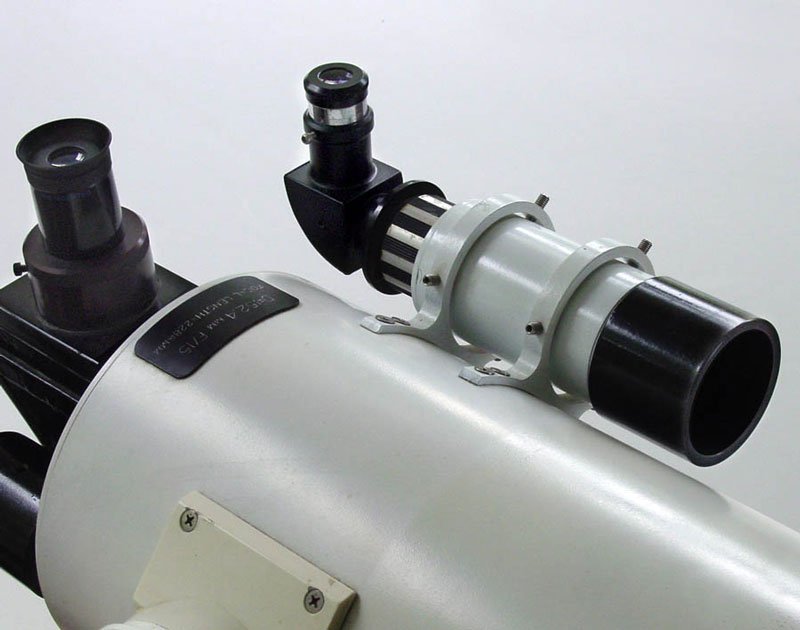
If you wish to avoid a stiff neck and painful contortions when looking through a straight-through finder, a right-angle finder scope may provide the solution. These scopes use a small prism diagonal to direct the light upward into the eyepiece at a right angle to the finder tube (see Figure 2.1 above). This makes it physically easier to look through the finder scope in most orientations. Larger diagonals are used in the focusers of refractor telescopes and Schmidt-Cassegrain (SCT) telescopes for the same reason.
Right-angle finders can be used with most telescopes, but they tend to be especially easy to use with Newtonian reflectors when they are placed in proximity to the telescope's focuser.
Figure 4.1 shows the components of a finder which uses a diagonal to direct light to an eyepiece at a right angle to the axis of the finder's tube. These right-angle finders have shorter tubes to allow for the extra path length of the light through the diagonal. As with straight-through finders discussed in Section 3, right-angle finders are brought to focus by adjusting the objective cell/dewshield or the position of the eyepiece. The finder in Figure 4.1 is focused by adjusting the dewshield containing the objective lens.

Right-angle finders are designed to work with the diagonal and eyepiece in place, so the diagonals are, in most cases, not removable. When the image from the finder's objective lens is reflected in the diagonal, it gets flipped upright again. So in a right-angle finder using an ordinary right-angle prism diagonal, up is up and down is down, but left and right are still reversed unless additional optics are incorporated in the finder to correct for this. A right angle finder that presents an upright but left-right reversed image is called a right angle erect-image finder.
Again, a left-right reversed image can still be a bit confusing at first and it takes a couple of nights to get used to. However, if you use a telescope with a diagonal such as a refractor or SCT, the orientation of the image in the telescope's eyepiece will match the orientation of the image in the right-angle erect-image finder. This can be an advantage and even desirable for some observers. However, right-angle erect-image finders are made by very few companies (most notably Antares in Canada) and so choices are very limited.
Many stargazers strongly prefer a finder that shows the sky in the same orientation as they see it with their eyes. If they move a telescope up or down or left or right, they want the image in the finder to move the same way. That's why right angle correct-image (RACI) finders have become popular. They use a diagonal containing an additional optical element, an Amici roof prism, to produce an image with the same orientation as you see with your eye. This makes it very intuitive to navigate around the night sky. These finders also work well for terrestrial use. Because of the special Amici prism required to produce a correct image, these finders tend to be slightly more expensive than simple straight-through finders.
All RACI finders use a right-angle diagonal, so for observers who prefer to look straight through a finder, these scopes may not be the best choice. However, there are some finders that produce an erect image without a right-angle diagonal, including the premium finder made by Explore Scientific shown in Figure 4.2 below.

Can a straight-through finder be converted into a right-angle finder?
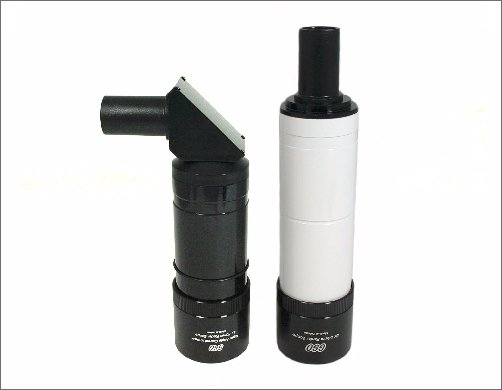
While it is technically feasible to convert a straight-through finder into a right-angle finder, it is neither easy nor economical to do so. Even if you can assemble a prism diagonal, eyepiece, and adapter to mechanically fit into a straight-through finder, it will be impossible to reach focus in such a converted finder scope. That's because all diagonals introduce an additional optical path length (typically 50-80mm long), so they require a significant amount of "back-focus" (in-focus travel) to compensate for this added length in order to reach focus. For this reason, the tubes of right-angle finders need to be significantly shorter than their straight-through counterparts. The hardest part of doing a conversion is cutting the straight-through tube down to the appropriate length and re-threading the rear end to accept the diagonal/eyepiece coupler. Given the cost and effort required to do this, you are always better off simply buying a right-angle finder instead. For the same reason, it is also not possible to use guidescopes (which are essentially straight-through finders) as right-angle finders by the addition of a diagonal. Figure 4.3 below shows the difference in the lengths of the main tubes of GSO's 50mm straight-through and right-angle finders, two scopes which are otherwise identical.
5. Finder Reticles and Illuminators
Finder Reticles
All finder eyepieces also have a reticle, usually a set of perpendicular crosshairs that intersect at the center of the field of view. When you align the optical axis of the finder with the optical axis of the telescope, an adjustment you should make before each observing session using collimating screws in the finder mounting bracket, the crosshair makes it easy to sight an object. With a well-aligned finder, you just have to center your target in the finder crosshair to get the object in the much smaller field of view of the telescope.
Some finder reticles are just simple perpendicular crosshairs. Others are dual perpendicular crosshairs that leave a small gap at the center of the field of view so a star at this position is not blocked. Figure 5.1 shows how single and dual crosshair reticles appear.

Some reticles are calibrated to show specific angular spans. In the Explore Scientific 8x50 erect-image illuminated finder scope shown in Figure 4.2, for example, the reticle is marked with notches at 1.5°, 3°, and 4.5° with a full field of view of 6° (see the reticle in Figure 5.2).
The reticle in a finder eyepiece is at a fixed plane, and most finders do not have a diopter adjustment to enable observers with eyeglasses to adjust the focus of the reticle. Some premium finders, however, do have this adjustment.
Two types of reticles are used in astronomy finders. Less expensive finders have delicate perpendicular wires as cross hairs. These are susceptible to damage and are less precise. Superior finders use laser-etched reticles on glass, a solution which is much more robust.

Reticle Illuminators
Some finder scopes are equipped with a reticle illuminator – a small, cylindrical device with an on-board battery-powered red LED with adjustable brightness – that makes it much easier to see the reticle pattern against the background sky. The illumination is not variable by 0-100%, but more typically by 50-100% (and with an ‘off' setting). For observers who observe under grey urban or suburban skies, illuminated reticles are usually unnecessary. But in very dark skies, where it's hard to see a dark reticle, illuminated finder reticles can be very useful. Figure 4.2 and Figure 5.3 show examples of finder scopes with illuminated reticles.

With your main telescope, you can swap out standard eyepieces with 1.25" or 2" barrels. But eyepieces and reticles in most finders are fixed and not replaceable or interchangeable. That means the choice of reticle design is an important factor when shopping for a finder. However, as you will learn in the next section, there is a type of small refractor telescope—a guide scope—that allows you to swap out standard 1.25" eyepieces.
6. Guide Scopes and Large-Aperture Finder Scopes
Like finder scopes, guiding telescopes are small refractors mounted on a larger telescope, and they are usually used with a small digital astronomy camera in place of the eyepiece to help guide the larger scope and its mount accurately through the long exposures used for deep-sky astrophotography. But guide scopes can also make excellent finders, and some stargazers who prefer larger finder scopes or finders with better optics and focusing mechanisms rely on these scopes to help find their way around the sky.

To turn a guide scope into a finder, you must simply add a reticle eyepiece, with either non-illuminated or illuminated reticles, to achieve an acceptable magnification and field of view. The Agena 60mm f/4 guide scope, for example, has a focal length of 240mm. An economical eyepiece such as the Agena 20mm Wide-Angle eyepiece with focusable reticle gives a magnification of 12x and a field of view of 5.8° with this telescope. The eyepiece mounts securely in the focuser with set screws. It's also straightforward to insert another reticle eyepiece in a guide scope if you want a higher magnification or if you wish to upgrade to an illuminated reticle. This is usually not possible with standard finder scopes.
One disadvantage with guide scopes when used as finders: it may not be possible to achieve focus with all eyepieces because of the limited travel range of the scope's focuser. Even some reticle eyepieces may not come to focus. Adding a star diagonal, with its extra length, may also make it even more difficult to bring an eyepiece to focus. So guide scopes are usually used as straight-through finders.
Another consideration with guide scopes is their weight. In example above, the 60mm guide scope and eyepiece weigh 35oz without mounting hardware, while a standard GSO 8x50 right-angle finder weighs just 11.5oz without mounting hardware. Using a guide scope as a large finder is a solution best left for telescopes greater than 8" in aperture with a solid altazimuth or equatorial mount. Guide scopes and a reticle eyepiece are also typically more expensive than a standard finder.
7. Finder Brackets, Rings, and Mounting Options
Once you have selected a finder for your telescope, you need to mount it to the telescope tube or focuser and align it so it points in the same direction as the telescope. Many finders come with the required mounting hardware, and if you're certain your finder will attach to your scope, you can skip this section. But if you are uncertain about how to mount your finder scope, then this section will help you sort out the many options available.
Finder Brackets
With such a wide range of options for finder scopes and a wider range of telescopes that use finders, there is no single one-size-fits-all option for mounting a finder to a telescope. But there are a few general considerations or guidelines that will help you make sure you choose the right finder and mounting system that suits your requirements.
All finders, whether a standard ready-made finder or a guide scope, must be mounted into a bracket or pair of rings which hold the finder securely. Some finder brackets or rings mount directly and semi-permanently to a telescope into factory-drilled holes or a slot somewhere on the telescope tube or on the focuser itself. Other brackets or rings can be mounted with set screws to a quick-release base that is attached semi-permanently to the telescope. With a quick-release base, the finder and bracket can be quickly removed after an observing session and then reinstalled again with a minimal need for realignment. The mounting base for the finder bracket or rings is typically secured with small bolts to factory-drilled holes in a telescope focuser (for a refractor), the thick metal mirror holder at the rear of the tube (for a Schmidt-Cassegrain), or into the telescope tube itself (for Newtonians).
Most finders up to an aperture of 50mm are held in a bracket with adjustment screws to aid with alignment. Two types of brackets are common. The more modern 3-point bracket uses a single spring-loaded screw and two manual adjustment screws. This bracket is more common, but it has the disadvantage of being susceptible to flexure if the finder is accidentally bumped.
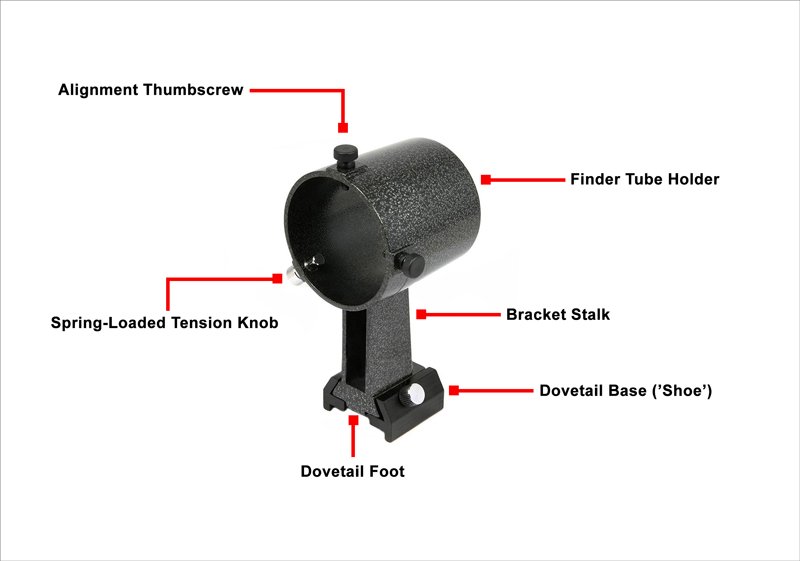
In Figure 7.1, for example, you see an 8x50 finder mounted in a single 3-point bracket with adjustable set screws and a fixed spring-loaded screw to allow you to adjust the position of the finder to aim in the same direction as the telescope. The bracket is integrated with a stalk with a quick-release dovetail base that mounts onto the telescope. Figure 7.2 shows this same finder bracket with its various parts identified.
Some finder scopes can be mounted with a set of two rings that are either separately bolted semi-permanently onto the telescope tube or integrated onto a rail which slides into a dovetail base. Each ring has three adjustable set screws, usually with plastic or nylon tips to prevent scratching, to help align the finder to the telescope. Mounting a finder with rings helps prevent the slight flexure associated with single brackets and mounting stalks which can be a problem for longer and heavier finders. Alignment can be a little more complex, but the finder is more secure with a pair of rings.

Mounting Bases
The dovetail "foot" at the bottom of a finder bracket is designed to slide into a dovetail mounting base or "shoe" fixed to the telescope with a set of screws. Unfortunately, there is a lack of a single standard for finder dovetail bases in the astronomy industry. Manufacturers have different sizes and configurations of dovetail bases and different screw hole mounting patterns for telescope tubes.
There are at least three commonly encountered designs (see Figure 7.4 below). There is the Vixen/Synta design which is a smaller version of a similar dovetail/base design for telescope rails and mounts. There is an "inverted T" design, and there is a flattened "U shape" design.
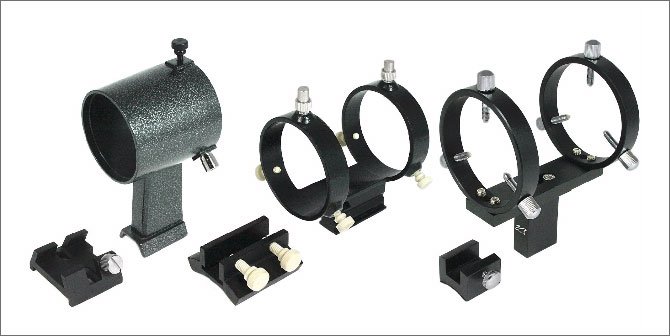

The Vixen/Synta base is the most common dovetail finder base(see the left base in Figures 7.4 and 7.5 above). First introduced by Vixen of Japan, and subsequently popularized by Synta, a large contract manufacturer of major brand telescopes, this is the closest to a "universal" design for finders. This base has an angled V-design and comes in several sizes and with different mounting hole patterns for the telescope (see Figure 7-6 below for some commonly available hole patterns). Many telescopes sold by major manufacturers feature this finder base. These bases can be used on tubes as well as on flat surfaces. In some cases, the finder base is incorporated into the cast focuser. In this case a separate base is not required.
The second style is what we call an "inverted T design" (see the middle base in Figures 7.4 and 7.5). This slot design is popular on Meade SCTs, all Explore Scientific telescopes, and on Antares finders.
Finally, a newer "U design" dovetail base has become popular (see the rightmost base in Figures 7.4 and 7.5). This is offered by William Optics and some generic finder manufacturers. The advantage of this shoe is its smaller footprint, allowing it to be used in tight spaces (typically on focuser bodies as opposed to being mounted on telescope tubes).
Unfortunately, even within each of these designs, the physical dimensions of these bases is not standardized. For example, we have seen at least four different variations in dimensions of the Vixen/Synta style bases. While most of these bases and finder stalks are interchangeable within a given design style, you will always encounter the odd case where a Vixen-style finder bracket does not slide into a Vixen-style base due to size differences. Similarly, all three suppliers of the inverted-T style bases use slightly different physical dimensions, making it frustrating to mix and match finders and bases even just within this design style.

Some finders are sold with an included set of brackets or rings and a mounting base. Other finders come with no mounting hardware and the user must purchase it separately.
A word of advice: don't ever buy a finder without carefully comparing the base's hole mounting pattern with that on your scope.
8. Summary
Every telescope needs a finder, and if you need the extra light-gathering capability of a magnifying finder, or you wish to add a second finder to complement your non-magnifying Telrad or red dot finder, then you have a great deal of choice. We hope this article has helped you sort out and compare the many types of finder scopes and brackets on the market. With the information in this guide, you will be ready to make the right choice for your telescope and observing interests.
Explore Magnifying Finders at Agena AstroProducts
Here are some links to finders and accessories on our website that you might find useful as you search for the right magnifying finder for your needs.