A Guide to Barlow Lenses for Astronomy
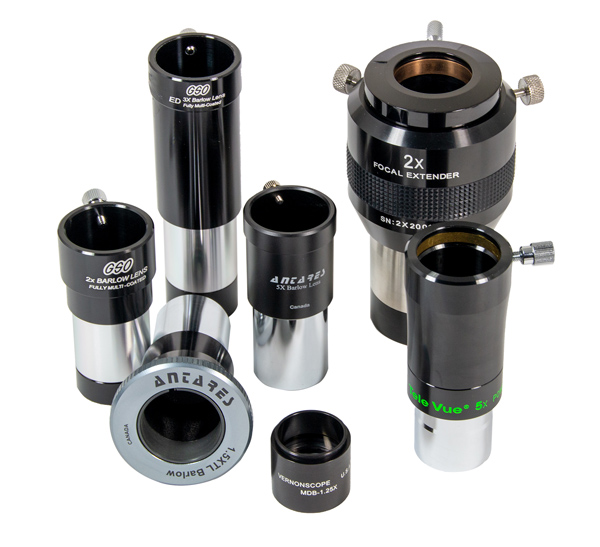
Figure 1 – An array of Barlow lenses. Image credit and copyright Agena AstroProducts.
1. Overview
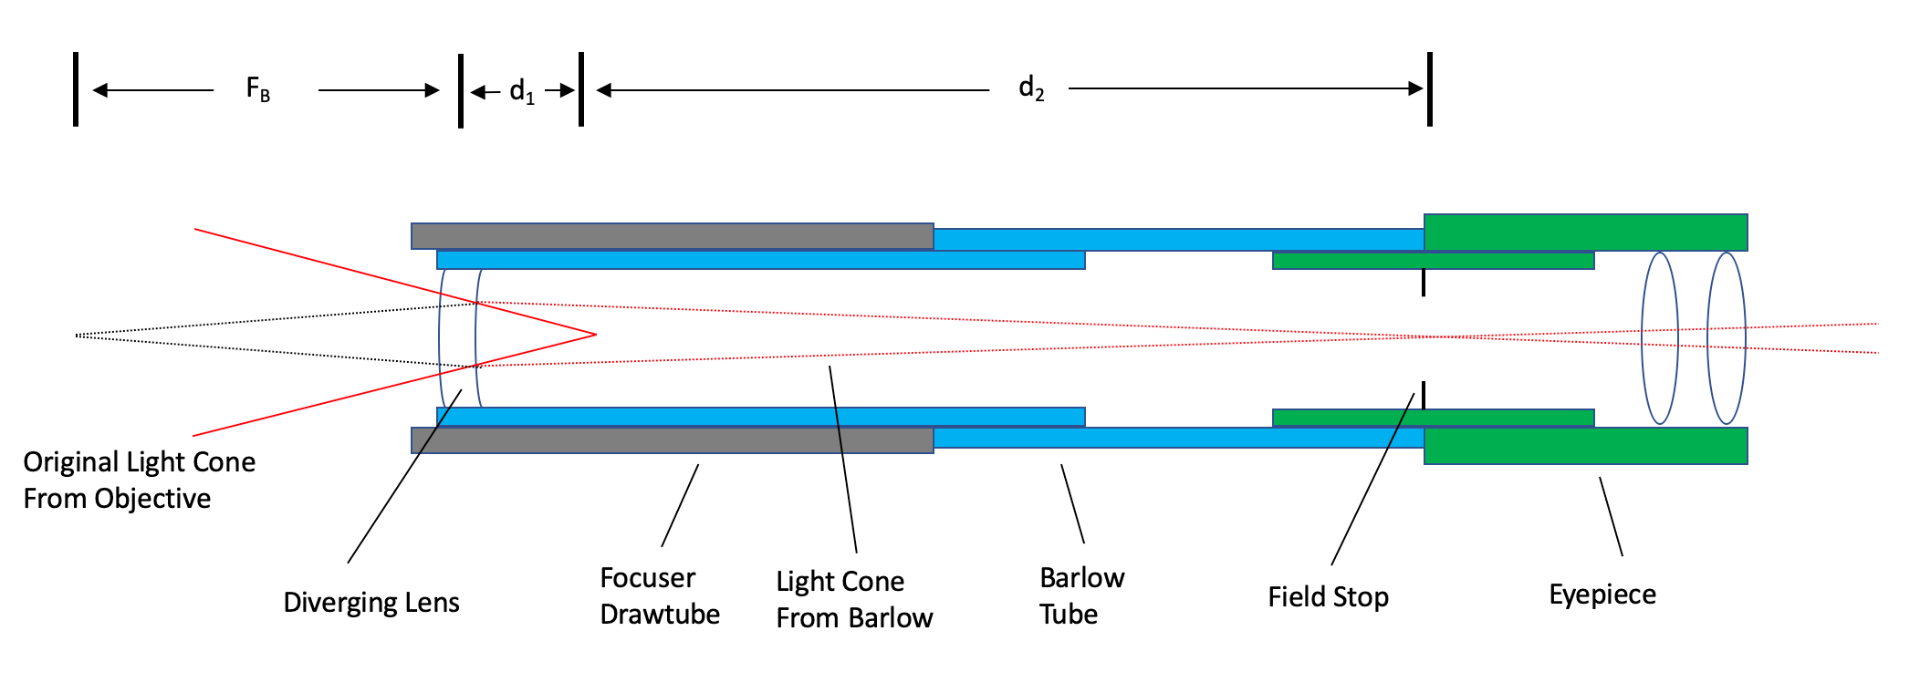
A focal extender, sometimes called Barlow lens, increases the effective focal length of a telescope and therefore increases the magnification of a given eyepiece used with that telescope. As a diverging lens, a focal extender works by reducing the angle of convergence of light from the objective lens of a telescope before the light enters the eyepiece (see Figure 2), making it seem as if the light was coming from an objective with a longer focal length and slower focal ratio. For visual observation, this longer effective focal length increases the magnification achieved by a given eyepiece and it means that each eyepiece delivers two magnifications, one with the Barlow and one without. For astrophotography, especially lunar, solar, and planetary imaging, a focal extender or Barlow increases the size of an image which helps increase the number of illuminated pixels on the camera sensor.
This guide explains how focal extenders work, what to look for when choosing one, and some more advanced considerations when using Barlows for visual observing and imaging.
2. Barlow Lens Basics
Most Barlows come in a configuration in which the lens is mounted in a tube with a 1.25” or 2” barrel. One end of the tube goes into the drawtube of the focuser. An eyepiece (or camera) goes into the other end (see Figure 2). The focal length of the Barlow lens and its position inside the tube is selected to deliver a nominal magnification factor, usually between 2x and 5x depending on the Barlow design, when used in this ‘focuser-Barlow-eyepiece’ configuration. The exact magnification factor depends on the location of the focal plane of an eyepiece and the position of the Barlow lens relative to the eyepiece, and in some cases may not equal the nominal magnification factor. So, for example, a 2x Barlow may not yield exactly a 2x magnification factor in all applications. This is addressed in more detail in section 3 below.
Early Barlow lenses, which were simple single-element concave lenses, had a reputation for degrading image quality. But modern Barlows result in very little image degradation. They all incorporate a second convex element to minimize chromatic and spherical aberration. Some premium ‘apochromatic’ Barlows use a third element of ED (extra-low dispersion) glass to further reduce chromatic aberration. In most high-quality Barlows, the lens elements are anti-reflection coated such that only a few percent of light is lost, even in budget Barlow lenses.
The magnification of a Barlow is not fixed. It can be varied by changing its position in the optical train or changing the distance between the lens and the eyepiece/camera. For example, if a star diagonal is used, to get the design magnification factor, it must go into the focuser drawtube first, then the Barlow goes into the diagonal, and finally the eyepiece goes into the Barlow. If the diagonal (or an extension tube) is placed between the Barlow and the eyepiece/camera, a different (higher) magnification factor will result. Later sections and the Appendix explain this in more detail.
The key advantage of using a Barlow lens for visual observing lies in its ability to extend the effective focal length of a set of eyepieces. For example, a set of three eyepieces with 9mm, 13mm, and 32mm focal lengths have an effective focal length of 4.5mm, 6.5mm, and 16mm when used with a 2x Barlow. That’s six choices of magnification with three eyepieces and a Barlow.

Figure 3 – A Televue 2x Barlow lens inserted between the focuser of a Newtonian telescope and a 24mm eyepiece.
Also, when used with a Barlow lens, eyepieces retain their eye relief (the distance at which you hold your eye to see the full field of view through the eyepiece). Longer eye relief is usually better (to a point), especially for eyeglass wearers. For a given eyepiece design, eye relief often decreases as focal lengths decrease. For example, a Tele Vue 15mm Plossl eyepiece has a relatively tight eye relief of just 10mm. However, a 32mm Plossl has a much more generous eye relief of 22mm. That means a 32mm Plossl with a 2x Barlow delivers a similar magnification to a 15mm Plossl without a Barlow, but the 32mm eyepiece is much more comfortable to look through.
Barlow lenses also allow the use of simpler eyepiece designs with fast focal-ratio refractors or reflectors. That’s because Barlows, as diverging lenses, cause light from a telescope’s objective to enter the eyepiece at a more acute (less steep) angle. This puts less demand on the eyepiece design to minimize aberrations, so good views can be obtained with simpler and less expensive eyepiece designs even with relatively fast telescopes of f/6 or f/7.
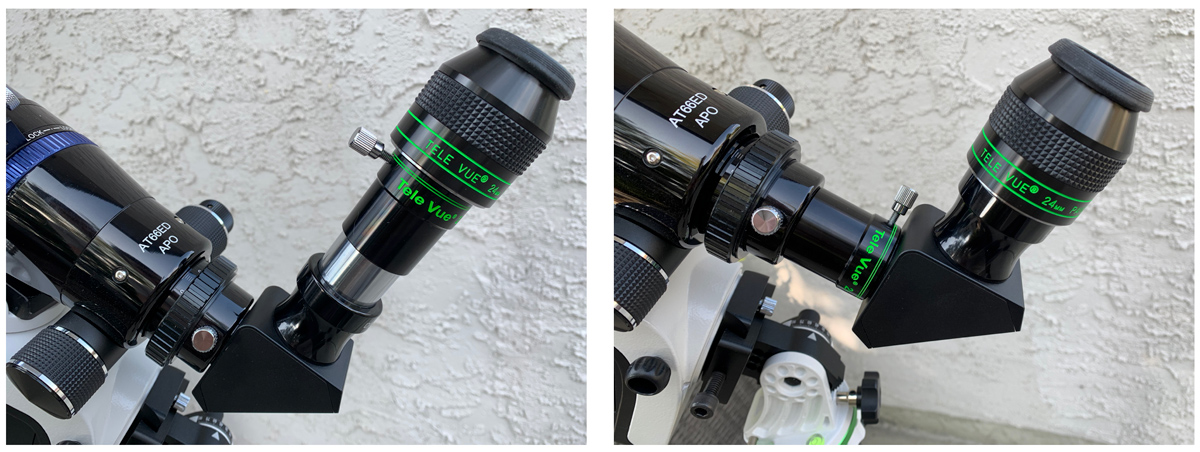
Figure 4 – An eyepiece inserted into a Barlow lens, which in turn is inserted into a star diagonal (at left). In this configuration, the Barlow delivers a magnification factor close to 2x. At right, an eyepiece is inserted into a diagonal which is inserted into the Barlow. In this configuration, the resulting magnification factor is much larger, closer to 3x.
Are there disadvantages to using a Barlow lens? There are two.
First, as mentioned, a little light is lost to reflection, but it’s usually too little to notice. Barlows don’t add much in the way of chromatic aberration. Nor do they add much spherical aberration when used at their nominal magnification factor. However, they do magnify any chromatic aberration that’s inherent to a telescope’s objective lens. When the position of a Barlow lens in the optical path is changed from its nominal position (through the addition of extension tubes, for example) its amplification factor will change and spherical aberration often increases. This is covered in the next section.
Also, since Barlows magnify an image, when used with extended objects like planets, they also make the surface brightness of an image dimmer. Doubling the magnification, for example, reduces the brightness of an extended object like a planet or nebula by a factor of four. But this effect is inherent to observing at high magnifications with or without a Barlow. Some beginning observers incorrectly fault a perfectly good Barlow for causing a dim image.
Similarly, some beginners incorrectly fault a Barlow for adding chromatic aberration to an image. Modern Barlows add very little chromatic aberration, but they can magnify chromatic aberration already present in a telescope/eyepiece combination.
3. Barlow Lenses - A Closer Look
Dropping an eyepiece into a Barlow lens assembly generally delivers a magnification factor that’s close to the nominal magnification factor specified by the manufacturer. But the true magnification factor depends on the distance from the Barlow lens to the focal plane of the eyepiece, and each eyepiece has a focal plane in a slightly different position relative to its shoulder. The shoulder is the edge of the body of the eyepiece that sits against the barrel of the Barlow (or the point where the nosepiece of the 1.25” or 2” eyepiece connects with the upper body of the eyepiece). As a result, the true magnification factor depends slightly on eyepiece design. And when using a Barlow with an astronomy camera or a DSLR, the magnification factor may be quite different because of the position of the sensor of the camera.
Equations 1 and 2 in the Appendix and Figure 2 help understand how the magnification factor MB depends on the distance (d2) between the Barlow lens and the position of the focal plane of the eyepiece and the focal length of the Barlow (FB):
MB = 1 + d2/FB
The distance d1 is a measure of the distance between the Barlow and the original focal plane of the telescope objective. As discussed in the Appendix, d1 and d2 are related to each other by:
MB = d2/d1
In practical terms, when using a Barlow, we adjust d1 by racking the focuser in or out to achieve a value of d2 that brings the image into focus at the focal plane of the eyepiece, which for most eyepieces is the same location as the field stop, or at the sensor of a camera. By making such adjustments, the magnification factor changes compared to the specified magnification factor.
A few examples will help illustrate this. Keep in mind that the calculations in the following examples are approximate, as are the equations in the Appendix.
- First, let’s assume we have a 2x Barlow lens with a focal length of 75mm, and that this lens is designed to deliver a 2x magnification factor when d2=75mm, that is, when the focal plane delivered by the Barlow is at the top of the Barlow tube. Let’s pick an eyepiece that has a field stop exactly at the bottom of its main body, so when we insert it into the Barlow its field stop coincides with the focal plane of the Barlow. In this case, the Barlow delivers a magnification factor of exactly 2x. The value of d1 is 37.5mm, which means the Barlow lens sits 37.5mm in front of the original focal plane of the objective.
- Now let’s use the same Barlow lens, but pick an eyepiece with a field stop 6.5mm below the main body so that it lies inside the eyepiece barrel that inserts into the Barlow. In this case, d2 = 75mm - 6.5mm = 68.5mm. The above equations tell us that, in this case, MB=1.9x and d1=35.9mm. Not a big difference, but certainly different than the specified magnification factor of 2x.
- What happens if we insert a star diagonal in between the eyepiece and Barlow as in Figure 3? Let’s say we use the first eyepiece in the examples above, and the diagonal adds an additional optical path length of 80mm. That means d2=155mm and MB=3.1x. It also means d1=50mm, so we have to rack the focuser inwards by (50-37.5)=12.5mm to bring the image to focus in the eyepiece. This approach - inserting some length between Barlow and eyepiece in the form of a diagonal or extension tube - is an easy way to get extra magnification although it may add some spherical aberration. In some cases, the additional path length between Barlow and eyepiece requires the focuser to be racked in more than is physically possible, which means the system can’t reach focus.
- As a fourth example, let’s replace the eyepiece with a ZWO ASI224MC camera that inserts directly into the same Barlow (with no diagonal). The ASI224MC has a sensor recessed 12.5mm from the edge of the camera body that sits directly on the top of the Barlow when it’s inserted. That means d2=75mm+12.5mm=87.5mm, and MB=2.17x, a little above the nominal value.
- Finally, let’s consider a DSLR camera. Using a T2 to 1.25” adapter, it is possible to connect a DSLR with a T-ring to a Barlow lens. A few Barlows even include a male T-thread that threads onto the camera’s T-ring. In either case, the sensor of the DSLR and T-ring combination sits about 55mm from the top edge of the Barlow. So in this case, d2=75mm+55mm=130mm, MB=2.7x, and d1=47.5mm. Again, because of the distance between the Barlow lens and camera sensor, the resulting magnification is significantly higher than the design magnification factor of 2x.
Another application for a Barlow, one often discussed in online forums, involves using a Barlow with some Newtonian reflectors to push out the focal plane of the objective so that it can come to focus with a camera. This works in principle but it doesn’t always work well in practice unless the Barlow lens cell could simply be attached to the camera nosepiece. But since the Barlow usually comes in a long tube, getting the system to focus requires racking in the focuser to move the barlow closer to the objective. But many focusers don’t have enough inward travel, which puts you back where you started.
The above five examples show the magnification of a Barlow increases with increasing separation between Barlow and eyepiece or camera. But is it possible to reduce the magnification factor of a Barlow? It is, in principle, by decreasing the separation of the two elements. In most cases, however, the Barlow’s tube gets in the way.
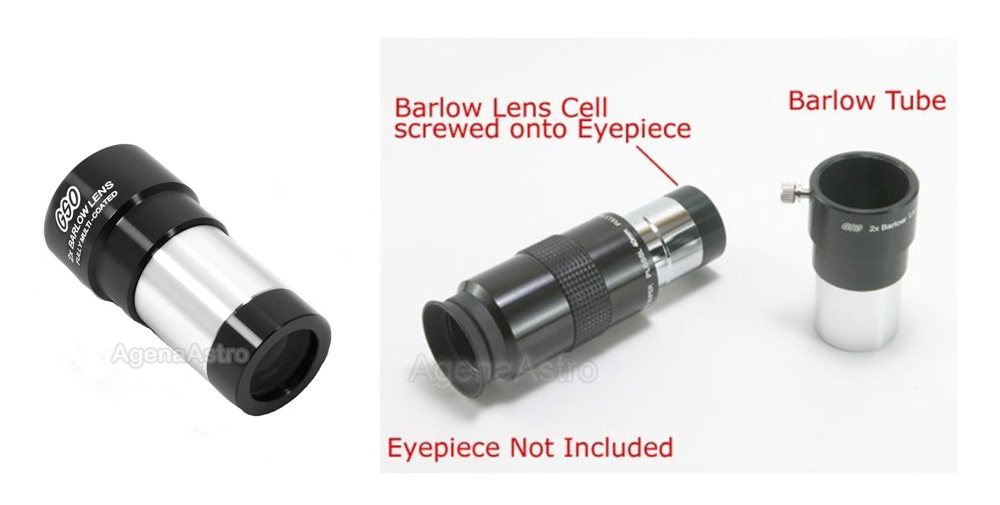
A few Barlows do allow a reconfigurable working distance and therefore multiple magnifications. The GSO 1.25” and 2” ‘Shorty’ Barlows, for example, can be used as a 2x Barlow with the included tube or as a 1.5x Barlow without the tube when the lens is threaded directly to the eyepiece (see Figure 5). That means each eyepiece in a collection now can have three magnifications.
4. Telecentric Focal Extenders and PowerMates
Barlow lenses introduce some aberrations at the edge of the field as well as vignetting when used with longer focal-length eyepieces. To correct this, optical designers can introduce another positive lens element to ensure field rays exit the lens parallel to the optical axis. Such a component is called a telecentric Barlow. Tele Vue Optics calls their telecentric Barlow a Powermate, while Explore Scientific calls it a focal extender.
Because they eliminate vignetting, telecentric Barlows are ideal for use with longer focal eyepieces with large apparent fields of view. They offer excellent correction for use in fast optical systems, and they’re generally parfocal and retain the position of the exit pupil of the eyepiece. Since the field rays exit parallel to the optical axis, telecentric Barlows work well when used with multi-layer optical filters and etalons like those used in some H-alpha solar filters. Commercially, telecentric Barlows are available in magnification factors of 2x to 5x, and their magnification factor is invariant (or nearly so) to the position of the eyepiece or camera. The 5x Powermates and Explore Scientific Focal Extenders are an exception: their magnification factor does vary with distance. For example, the 5x Powermate has a true magnification factor of 6.5x when its upper surface of the lens lies at a distance of 50mm from a camera sensor and 7.5x when it lies 100mm away (see Figure 6).
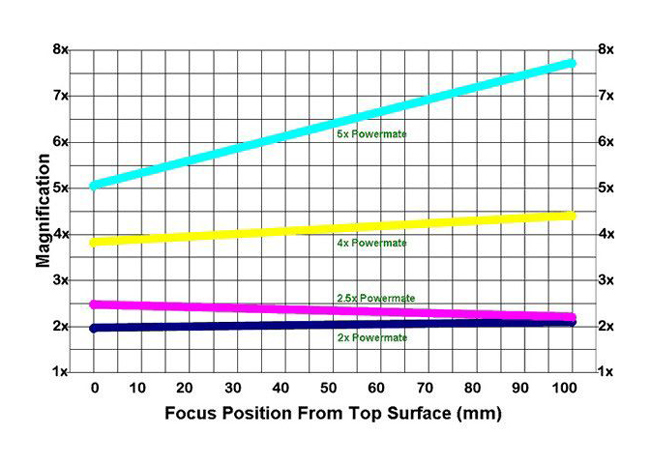 Figure 6 – The magnification of 2x, 2.5x, 4x, and 5x Tele Vue Powermate focal extenders relative to distance between the top surface of the Powermate and the camera sensor. Image credit and copyright Tele Vue Optics.
5. Other Considerations
5.1 ‘Shorty’ vs. ‘Long-Tube’ Barlows
Barlow lenses come mounted in a tube that’s slightly longer than its focal length of 75mm to 100mm, typically. For some users, such a tube is too long. Some vendors have introduced ‘shorty’ Barlows with shorter focal lengths and shorter tubes. There’s no trickery here: the focal length of shorty focal lengths are a consequence of a ‘stronger’ more curved diverging lens surface. This has the drawback of stronger aberrations, especially at the edge of the field of view, and especially in telescopes that are f/5 or faster. However, for visual observation, many ‘shorty’ barlows are perfectly good for viewing planets and features on the moon, for example. They have the advantage of inserting completely in smaller 1.25” star diagonals. The popular GSO Shorty barlow also comes configurable in 2x and 1.5x magnifications. It has a tube just 78mm long, some 19mm shorter than a TeleVue 2x Barlow, for example.
5.2 Stacking Barlows
In principle, Barlow lenses can be ‘stacked’ or combined in series to achieve a greater degree of magnification for visual observation and imaging. However, they are not necessarily designed to minimize aberrations when used in this way, so image quality may suffer. Two 2x Barlows placed back to back will not necessarily yield a 4x magnification factor unless the distance between the two lenses and to the focal plane of the eyepiece is set to a fixed value, much as a single 2x Barlow only yields 2x when its distance to the focal plane of the eyepiece is a particular value (see section 3). While it’s certainly fun to experiment with combining Barlows, better image quality usually results from getting another single Barlow lens with the desired larger magnification factor.
5.3 Filter Threads and Integrated T-Threads
Surprisingly, not many Barlows have 1.25” or 2” filter threads for attaching light-pollution, color planetary, or polarizing filters. In most cases it’s necessary to attach filters to the eyepiece or camera adapter that’s inserted into the barlow. In a few examples of barlows with removable lens cells, it may be possible to place a filter between the lens cell and the tube. This is possible, for example, in the GSO 1.25” and 2” 2x barlows.
A few Barlows such as the GSO 1.25” 2x T2 Barlow have an integrated M42 T thread for direct attachment to an astronomy camera or a DSLR with a 42mm T-ring. This means you don’t need an extra T-threaded prime focus adapter. With this GSO Barlow, you can remove the lens and use the prime focus adapter for other imaging applications.
5.4 Modular Configurations
Baader Planetarium offers a unique modular VIP (visual and photographic) Barlow. Like many Baader products, the VIP incorporates multiple interchangeable parts for maximum flexibility. This 2x Barlow can incorporate two filter sizes as well as various configurations for eyepieces and cameras.
5.5 Tubeless Barlows
Brandon (Vernonscope) offers 1.25x and 2x barlow lens elements in a cell only without any eyepiece holder tube. These can be directly attached to eyepieces or other adapters. Just a word of caution though - these come with two different types of attachment threads, so make sure that you select the right one for your needs (with standard 1.25” filter threads or a slightly different thread meant only for Brandon eyepieces).
6. Summary
Focal extenders or Barlow lenses are versatile and useful optical accessories for visual observing and astrophotography. When placed in the optical path in front of an eyepiece or camera, these optical elements lead to a longer effective focal length for a telescope objective and therefore higher magnification or larger images. This article explained the basics of how focal extenders work in various configurations and how their working distance affects their magnification factor, and it provided sufficient detail to help amateur astronomers choose and use the right Barlow for a particular application.
APPENDIX - BASIC EQUATIONS
The magnification factor MB of a Barlow lens depends on its position relative to the focal plane of the telescope’s objective lens and the focal plane of the eyepiece. In this Appendix, we look at the basic equations that help quantify this behavior to help understand how Barlow lenses work in various circumstances. To keep things simple, we assume the ‘thin lens’ approximation for a Barlow lens which means the radius of curvature of the lenses are assumed to be much larger than the thickness of the lens.
Manufacturers do not as a rule publish the focal length of their Barlows so it’s not always practical to apply the following equations. However, they serve as a guide to how Barlows work in various circumstances.
Figure A1 (same as Figure 2) helps illustrate the relationship between the magnification factor of a Barlow, MB, and its distance d1 from the original focal plane of the telescope’s objective and distance d2 from the Barlow to the focal plane of the eyepiece. In practice, d1 is adjusted by racking the telescope’s focuser in or out to make sure d2 is such that the image comes to focus. Then, if the focal length of the Barlow is FB, the thin lens equation says that:
-1/d1 + 1/d2 = -1/FB (Eq. 1)
The magnification factor of the Barlow is:
Combining the two equations, the magnification factor MB can be written in terms of d1:
This means that if d1=0 so that the Barlow is placed at the focal plane of the telescope objective, there is no magnification and MB=1. Alternatively if the Barlow is placed at distance FB in front of the focal plane, then d1=FB and MB approaches infinity. That means the light from the objective, after passing through the Barlow, exits the Barlow collimated and never comes to focus. So generally, the value of d1 ranges from between 0 and FB.
MB = 1 + d2/FB (Eq. 4)
This form of the equation is more useful since it’s easier to measure, at least approximately, the value of d2 rather than d1. If, for example, d2=FB, which means the distance from the Barlow to the focal plane of the eyepiece is the same as the focal length of the Barlow, then MB=2 and we have a Barlow that magnifies 2x. Move the same Barlow farther from the eyepiece by, for example, using an extension tube so that d2=2FB, then MB=3 (and d1=2/3 FB) and the Barlow magnifies 3x.